> ## Documentation Index
> Fetch the complete documentation index at: https://stackone-hub-claude-issue-384-20260409-1436.mintlify.site/llms.txt
> Use this file to discover all available pages before exploring further.

# Workday Job Custom Field

> To create job custom field in Workday, follow these steps

<Warning>
  This guidance assumes that you have admin privileges for your Workday account.
</Warning>

## Create Workday Job Custom Field

<Steps>
  <Step title="Search for 'Create Custom Object'">
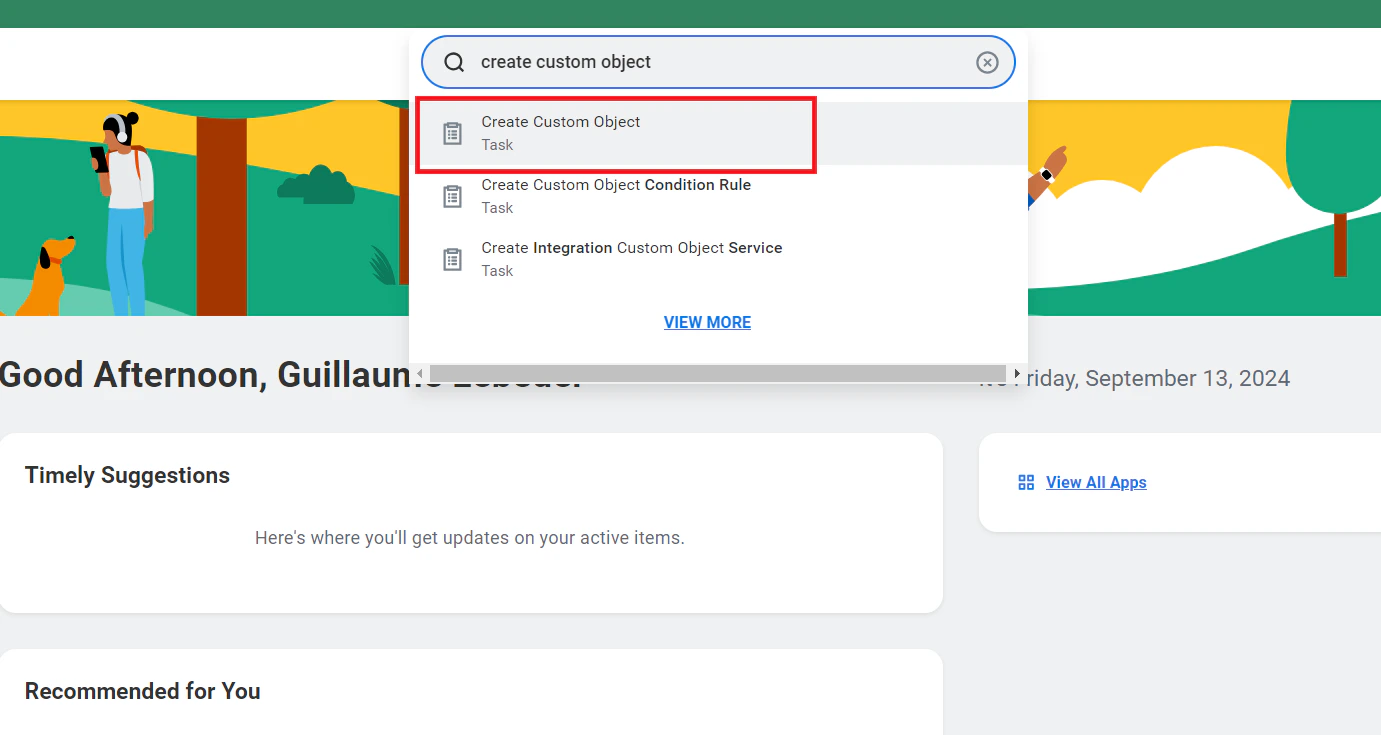
    Search for <b>Create Custom Object</b> in the search bar and select it.

    <Frame>
      <img className="rounded-md" style={{ margin: '0 auto', border: '1px solid #efefef' }} alt="Search Create Custom Object" src="https://mintcdn.com/stackone-hub-claude-issue-384-20260409-1436/EAY-SbLkvyoWwFJm/images/workday/custom-field/custom-field-01.png?fit=max&auto=format&n=EAY-SbLkvyoWwFJm&q=85&s=64f11df98ed9e7316ad36298f8119235" width="1381" height="735" data-path="images/workday/custom-field/custom-field-01.png" />
    </Frame>
  </Step>

  <Step title="Create Custom Object">
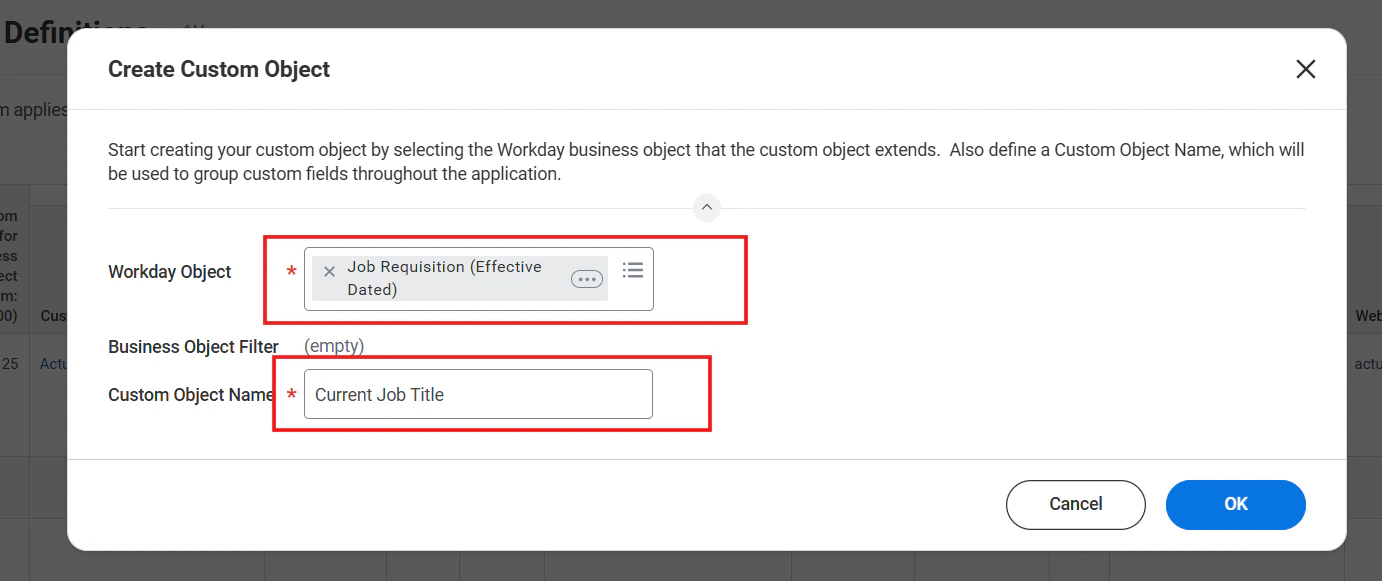
    Select <b>Job Requisition (Effective Dated)</b> in Workday Object.<br /> Enter a name for the custom object and click <b>OK</b>

    <Frame>
      <img className="rounded-md" style={{ margin: '0 auto', border: '1px solid #efefef' }} alt="Create Custom Object" src="https://mintcdn.com/stackone-hub-claude-issue-384-20260409-1436/EAY-SbLkvyoWwFJm/images/workday/custom-field/custom-field-02.png?fit=max&auto=format&n=EAY-SbLkvyoWwFJm&q=85&s=0932d760dfc315b3162612e2ecc1ff9a" width="1382" height="581" data-path="images/workday/custom-field/custom-field-02.png" />
    </Frame>
  </Step>

  <Step title="Click 'Field Definitions'">
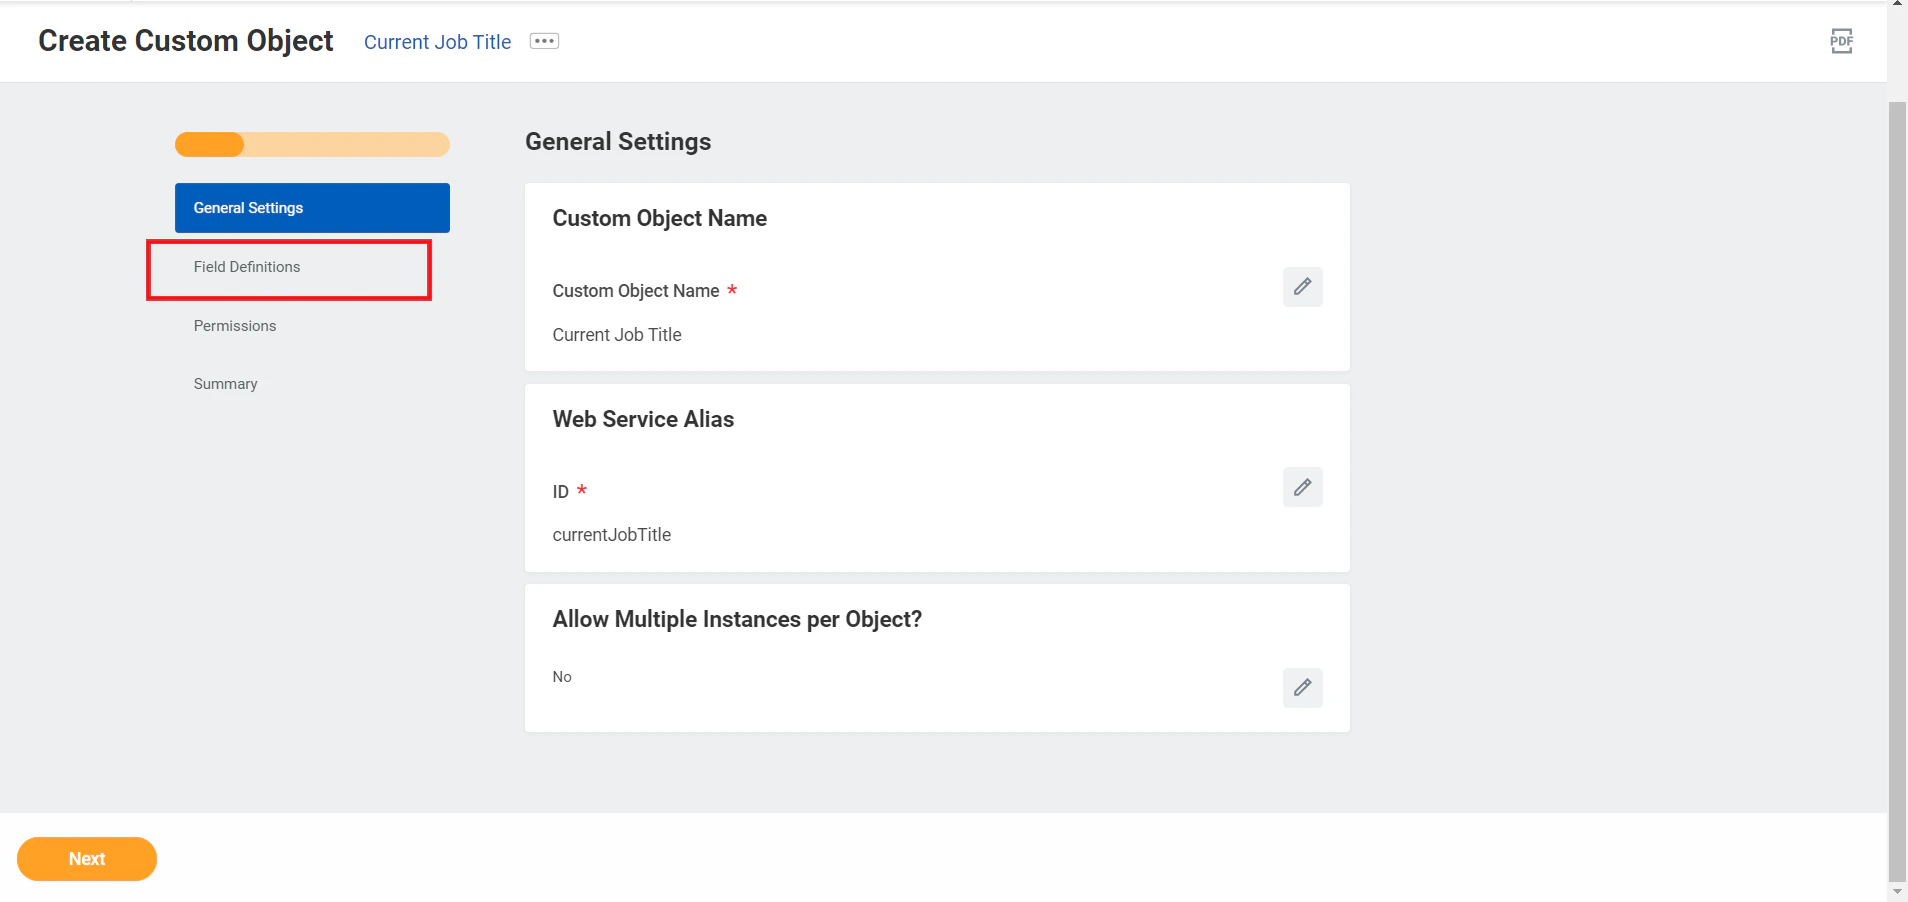
    Click the <b>Field Definitions</b> tab in the sidebar.

    <Frame>
      <img className="rounded-md" style={{ margin: '0 auto', border: '1px solid #efefef' }} alt="Click Field Definitions" src="https://mintcdn.com/stackone-hub-claude-issue-384-20260409-1436/EAY-SbLkvyoWwFJm/images/workday/custom-field/custom-field-03.png?fit=max&auto=format&n=EAY-SbLkvyoWwFJm&q=85&s=89b5bfcc3e57523cf1440a52f01fc3cd" width="1908" height="902" data-path="images/workday/custom-field/custom-field-03.png" />
    </Frame>
  </Step>

  <Step title="Click 'Add' button">
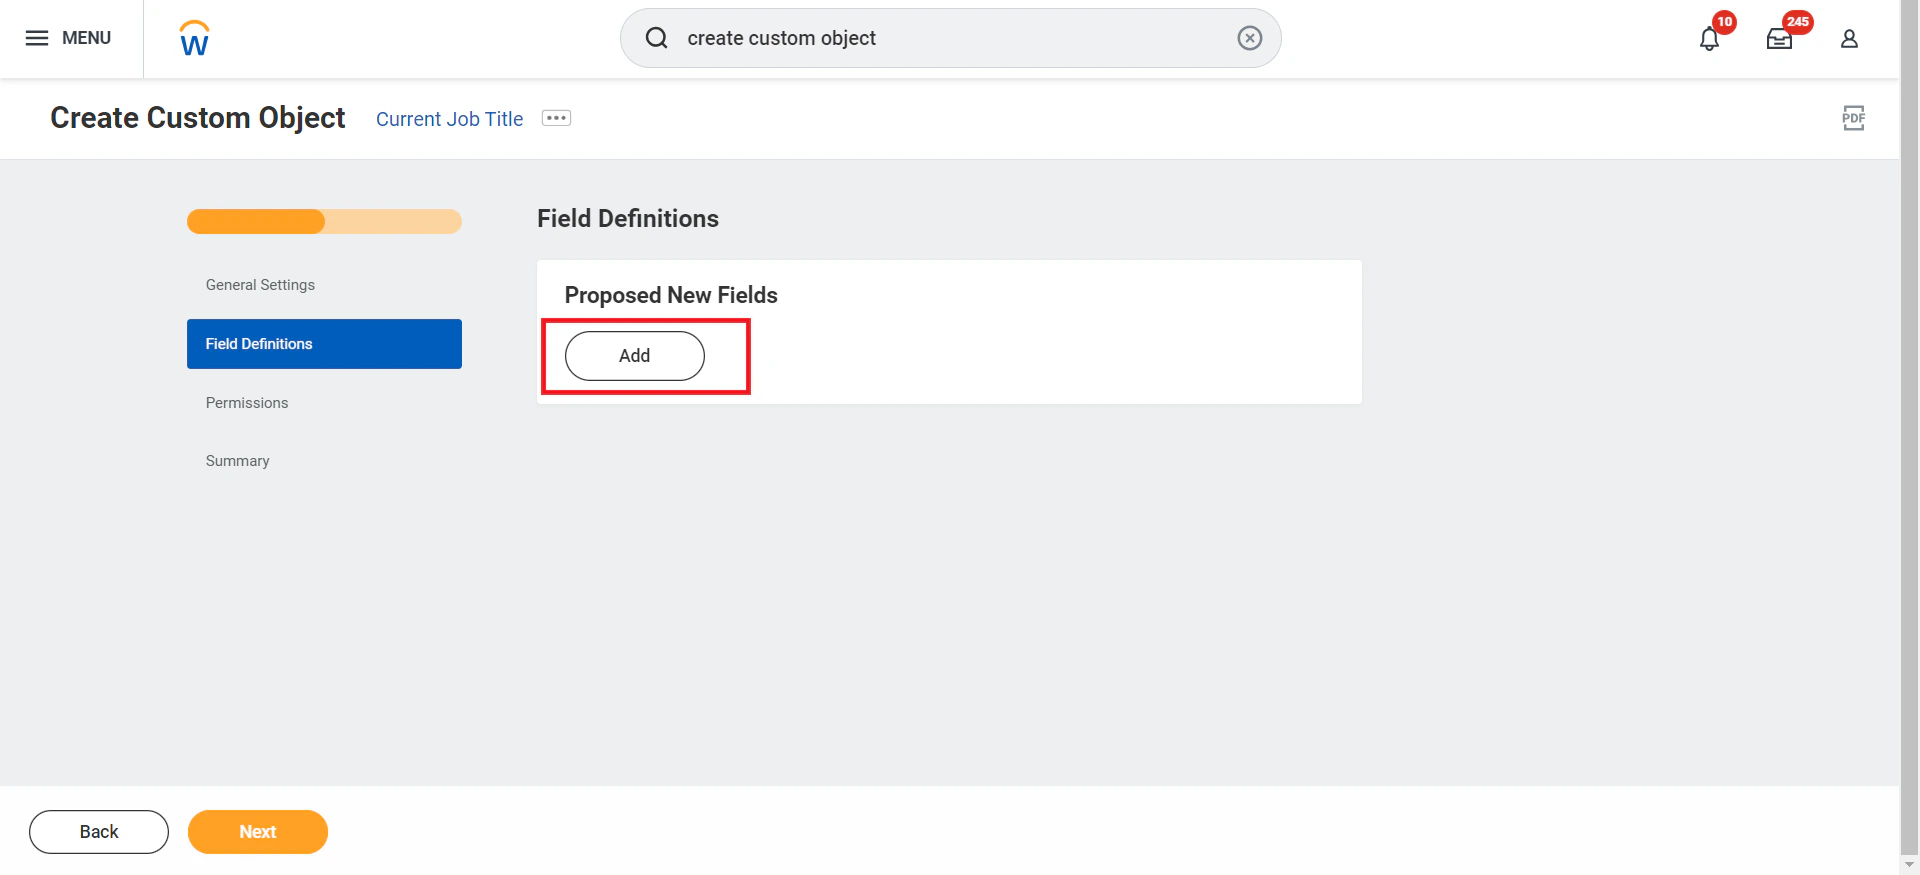
    Click the <b>Add</b> button in Proposed New Fields.

    <Frame>
      <img className="rounded-md" style={{ margin: '0 auto', border: '1px solid #efefef' }} alt="Click Add button" src="https://mintcdn.com/stackone-hub-claude-issue-384-20260409-1436/EAY-SbLkvyoWwFJm/images/workday/custom-field/custom-field-04.png?fit=max&auto=format&n=EAY-SbLkvyoWwFJm&q=85&s=4cb8e17ff2ca81d71295f4da180a4e72" width="1920" height="875" data-path="images/workday/custom-field/custom-field-04.png" />
    </Frame>
  </Step>

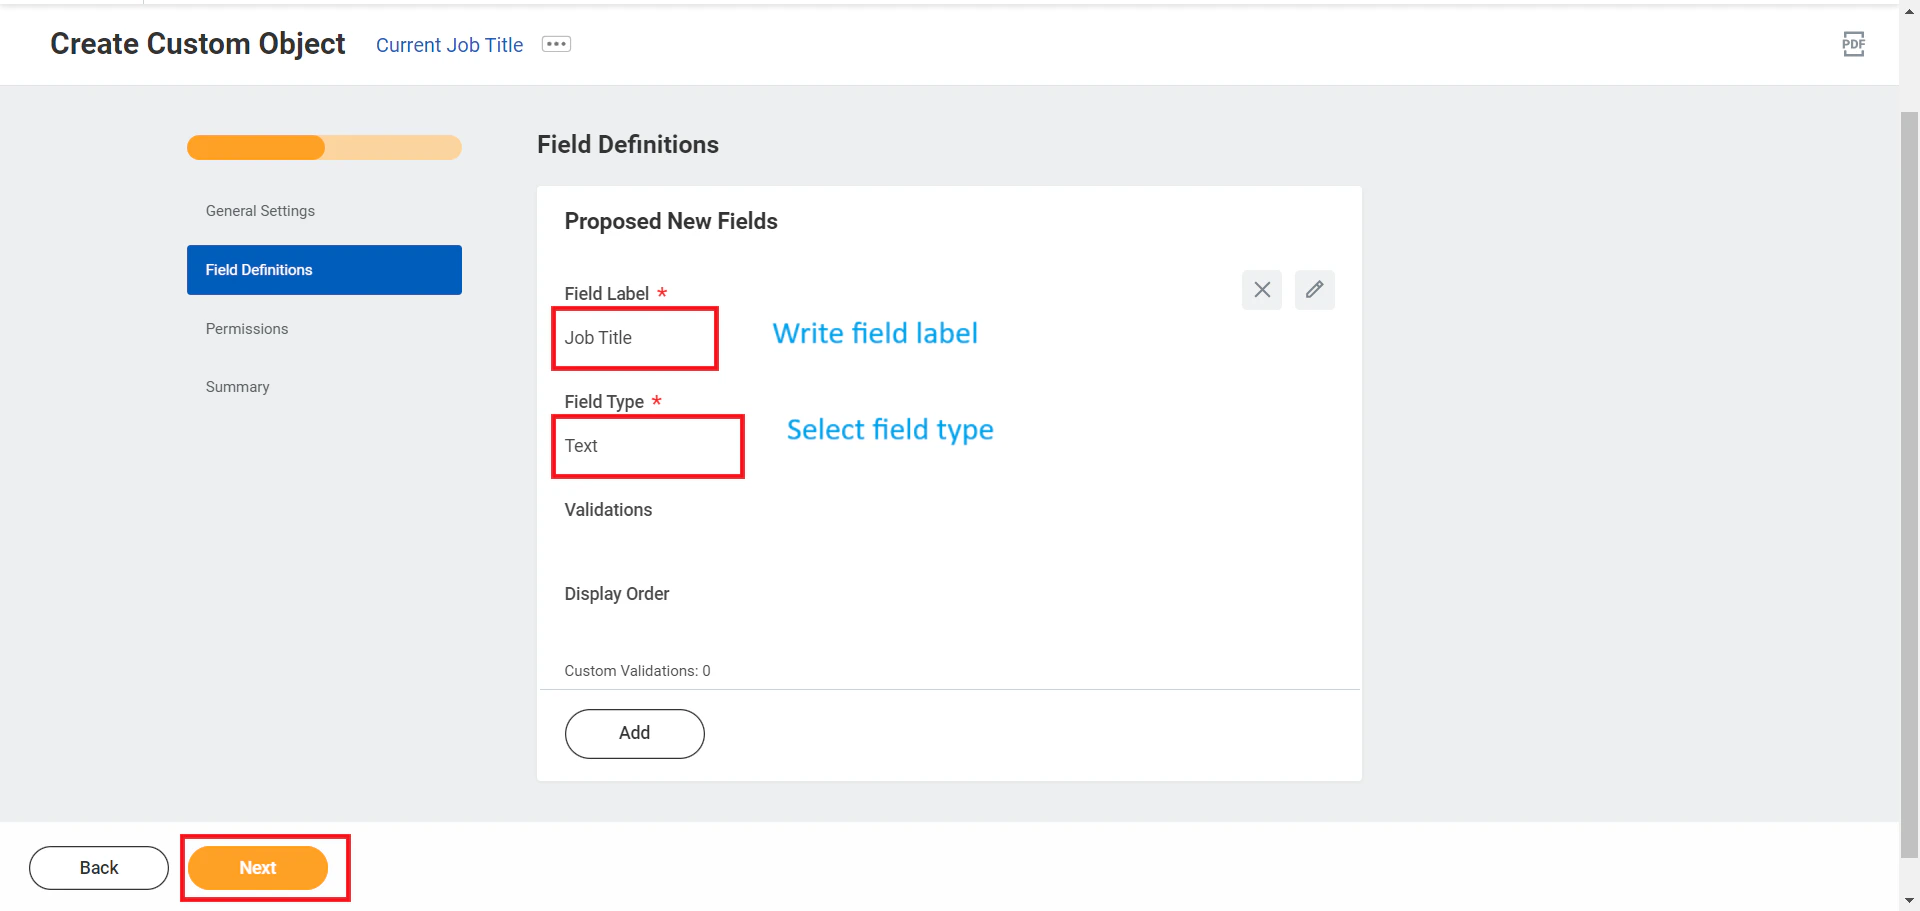
  <Step title="Enter Label & Field Type">
    Enter a label for the field, select a field type from the dropdown menu, and click <b>Next</b>

    <Frame>
      <img className="rounded-md" style={{ margin: '0 auto', border: '1px solid #efefef' }} alt="Enter Label & Field Type" src="https://mintcdn.com/stackone-hub-claude-issue-384-20260409-1436/EAY-SbLkvyoWwFJm/images/workday/custom-field/custom-field-05.png?fit=max&auto=format&n=EAY-SbLkvyoWwFJm&q=85&s=a15c42e078d0ac88b1ad7d841c71701c" width="1920" height="911" data-path="images/workday/custom-field/custom-field-05.png" />
    </Frame>
  </Step>

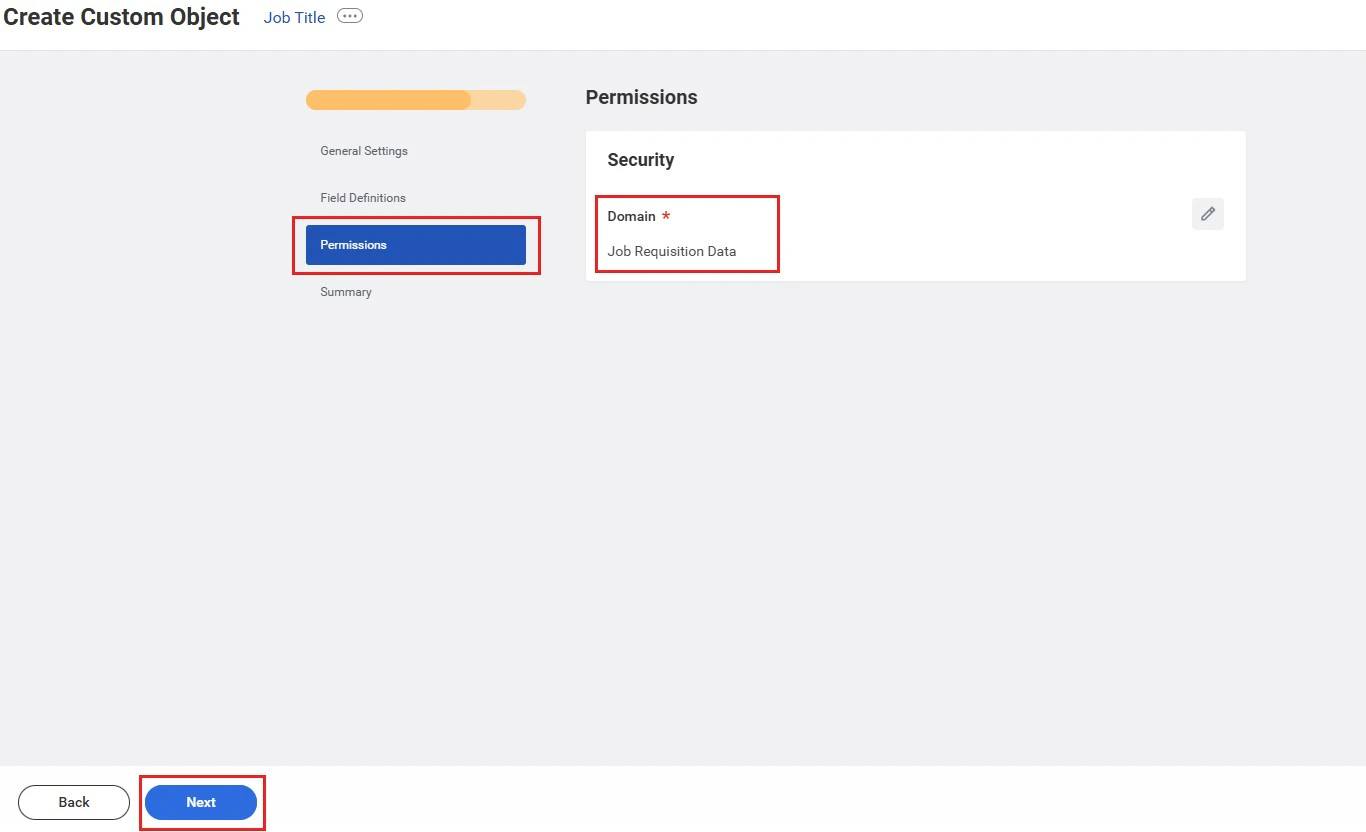
  <Step title="Select 'Job Requisition Data'">
    Select <b>Job Requisition Data</b> in Permissions tab and click <b>Next</b>.

    <Frame>
      <img className="rounded-md" style={{ margin: '0 auto', border: '1px solid #efefef' }} alt="Select Permission" src="https://mintcdn.com/stackone-hub-claude-issue-384-20260409-1436/EAY-SbLkvyoWwFJm/images/workday/custom-field/custom-field-06.jpg?fit=max&auto=format&n=EAY-SbLkvyoWwFJm&q=85&s=96be039373dd881ac162699431000afb" width="1366" height="832" data-path="images/workday/custom-field/custom-field-06.jpg" />
    </Frame>
  </Step>

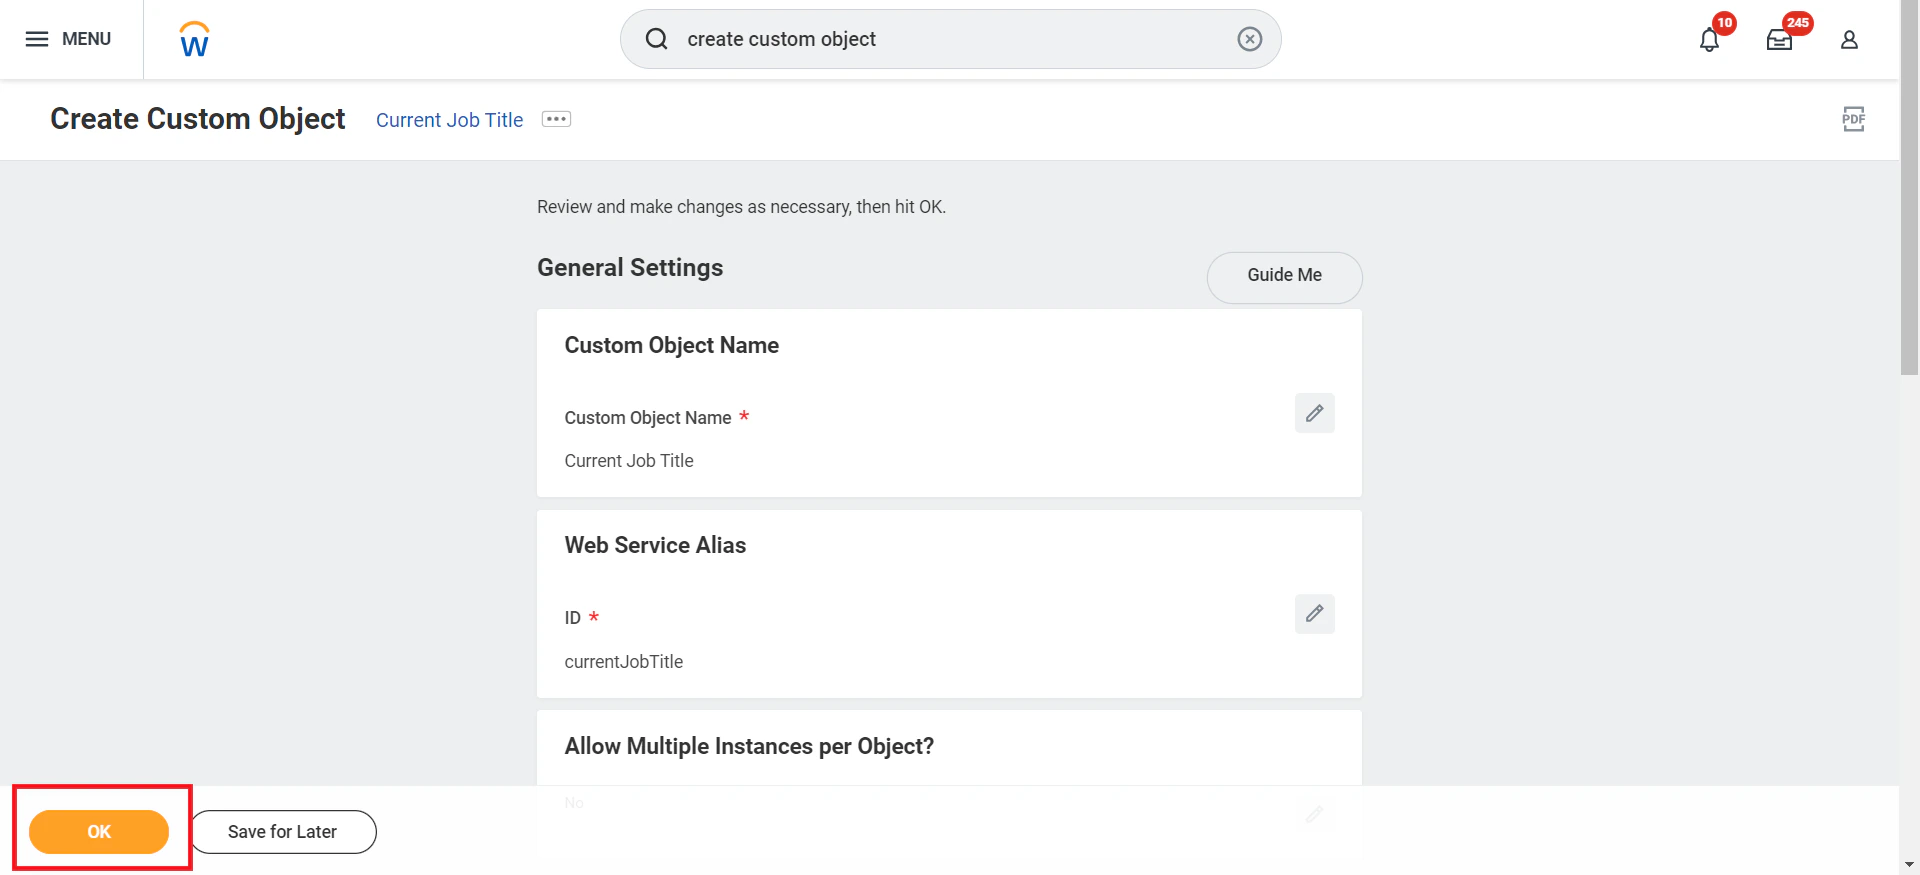
  <Step title="Review and Confirm">
    Verify the custom object summary and click <b>OK</b>

    <Frame>
      <img className="rounded-md" style={{ margin: '0 auto', border: '1px solid #efefef' }} alt="Review and Confirm" src="https://mintcdn.com/stackone-hub-claude-issue-384-20260409-1436/EAY-SbLkvyoWwFJm/images/workday/custom-field/custom-field-07.png?fit=max&auto=format&n=EAY-SbLkvyoWwFJm&q=85&s=a8ab459f9c7d2b886dd508652006af2b" width="1920" height="875" data-path="images/workday/custom-field/custom-field-07.png" />
    </Frame>
  </Step>

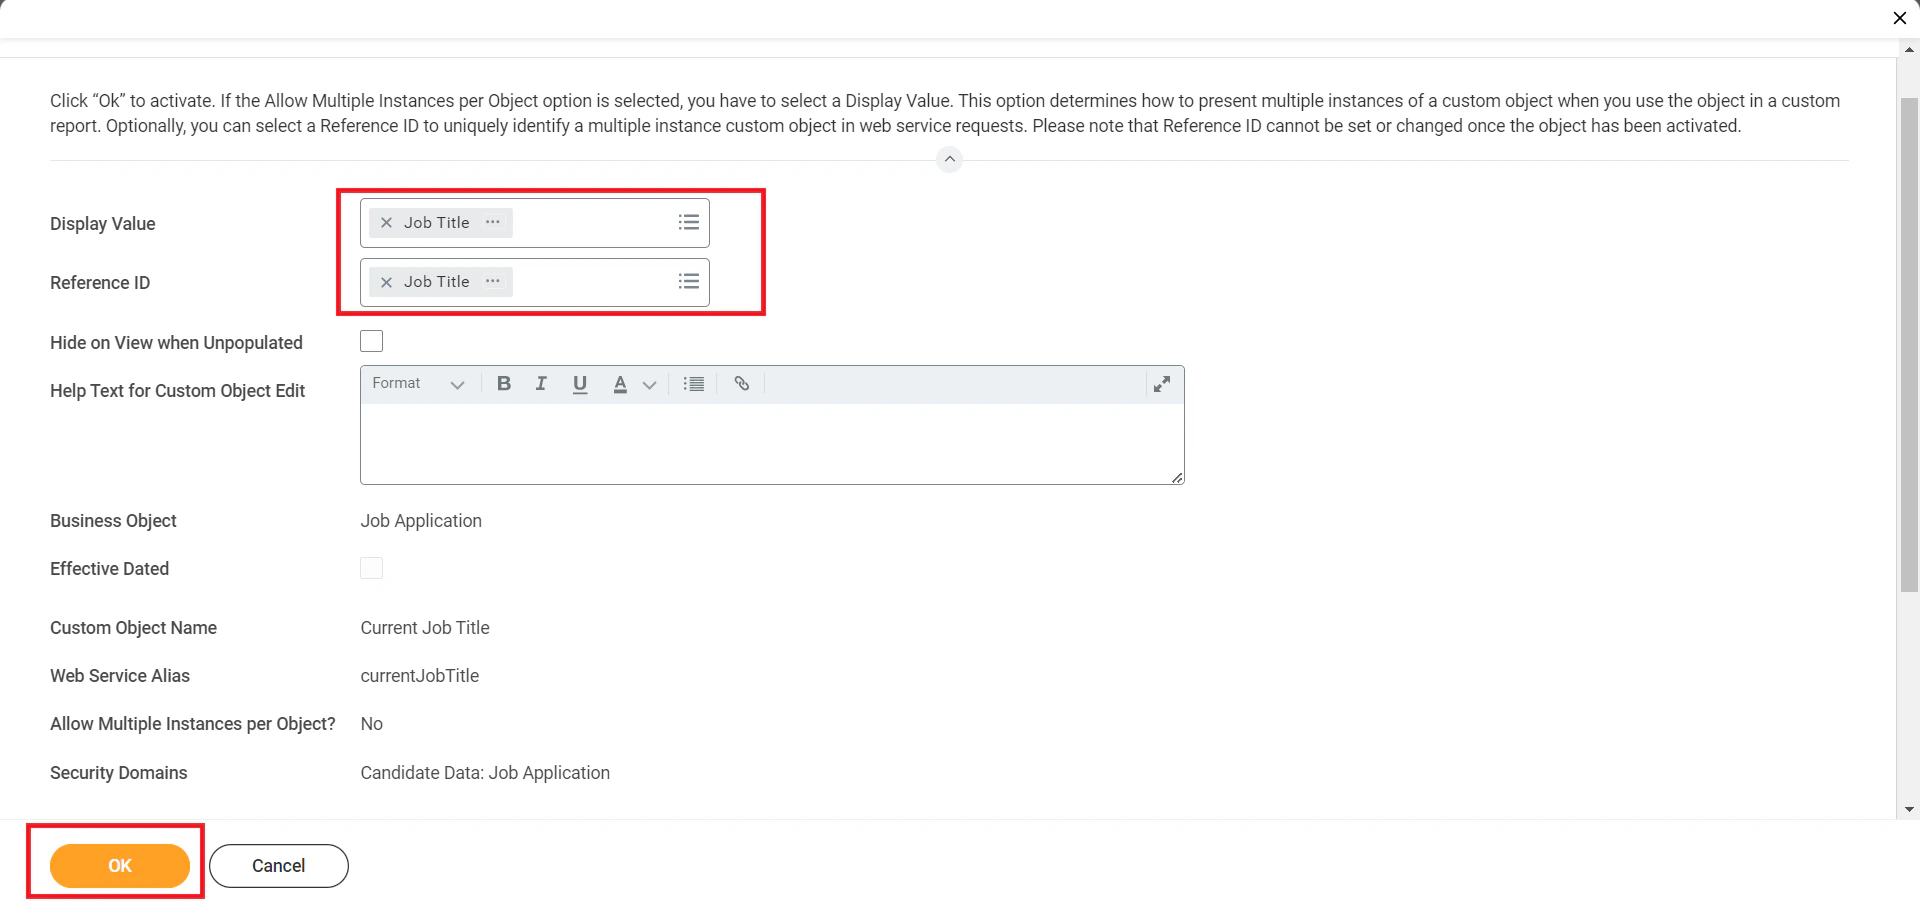
  <Step title="Configure Field Selection">
    Select the newly created custom field from the <b>Display Value</b> and <b>Reference ID</b> dropdowns if the Allow Multiple Instances per Object option is selected, and click <b>OK</b>.

    <Frame>
      <img className="rounded-md" style={{ margin: '0 auto', border: '1px solid #efefef' }} alt="Configure Field Selection" src="https://mintcdn.com/stackone-hub-claude-issue-384-20260409-1436/EAY-SbLkvyoWwFJm/images/workday/custom-field/custom-field-08.png?fit=max&auto=format&n=EAY-SbLkvyoWwFJm&q=85&s=f41e18bec04001f4993e8e8966bd05b8" width="1920" height="909" data-path="images/workday/custom-field/custom-field-08.png" />
    </Frame>
  </Step>

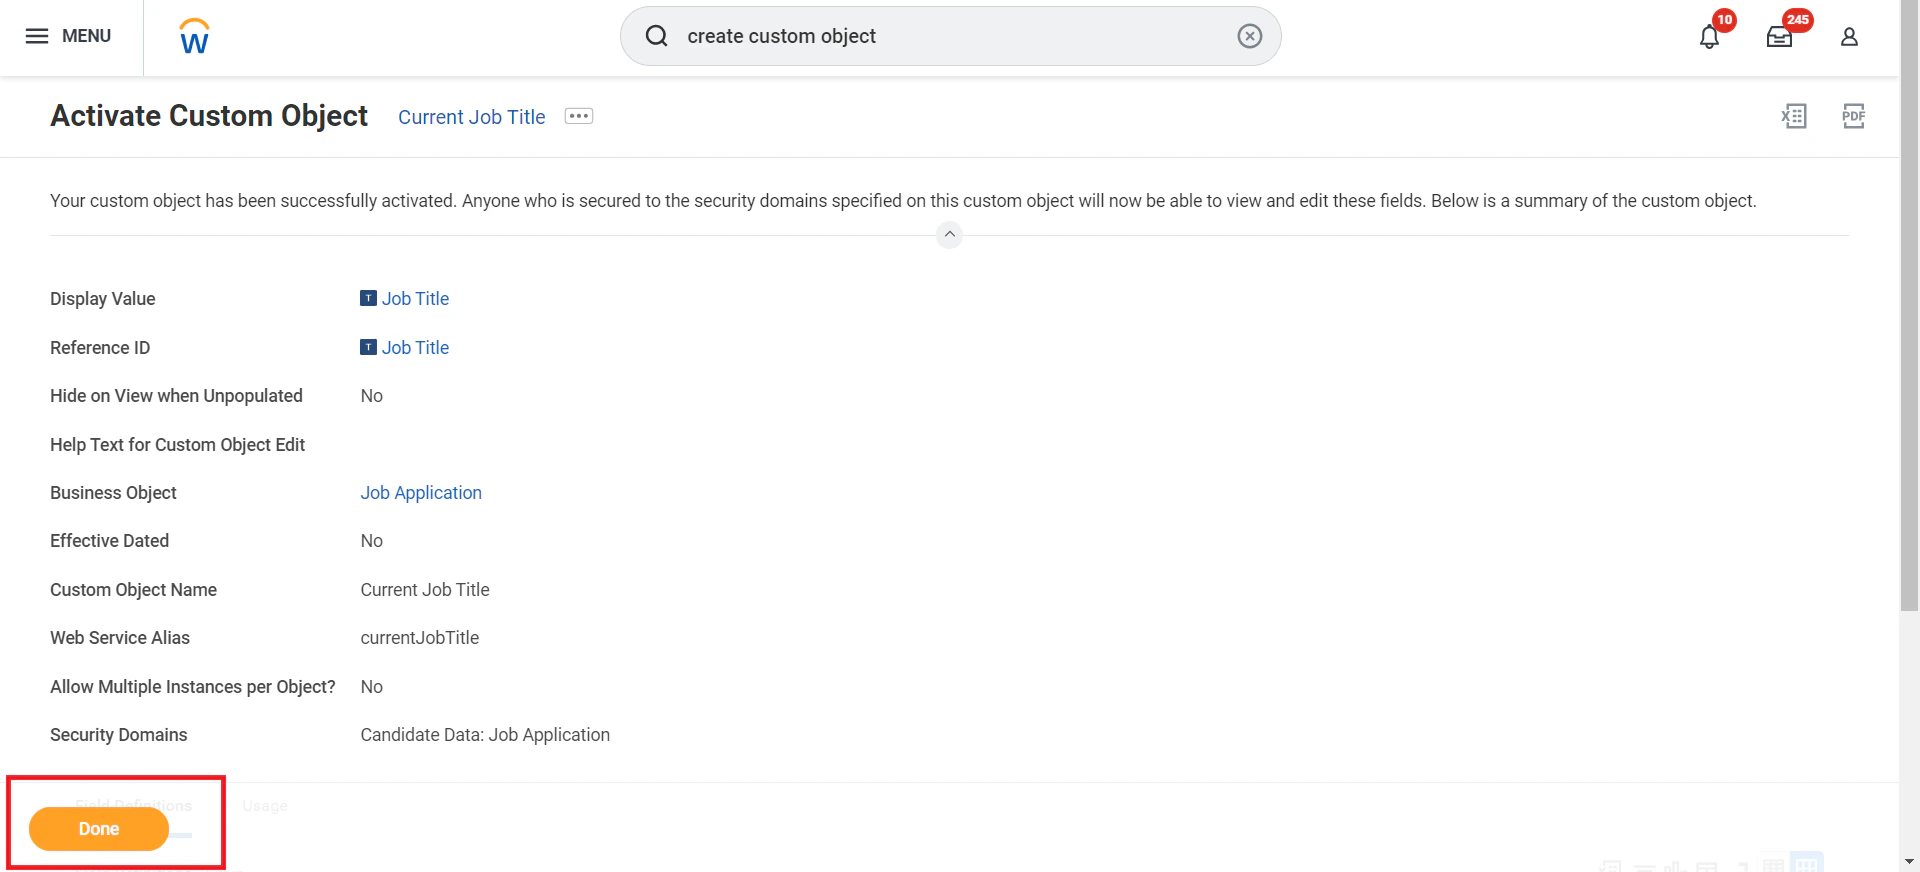
  <Step title="Activate Custom Object">
    Activate the custom object by clicking <b>Done</b>

    <Frame>
      <img className="rounded-md" style={{ margin: '0 auto', border: '1px solid #efefef' }} alt="Activate Custom Object" src="https://mintcdn.com/stackone-hub-claude-issue-384-20260409-1436/EAY-SbLkvyoWwFJm/images/workday/custom-field/custom-field-09.png?fit=max&auto=format&n=EAY-SbLkvyoWwFJm&q=85&s=35069f2b0bc36bd446ebc0c34331b87d" width="1920" height="872" data-path="images/workday/custom-field/custom-field-09.png" />
    </Frame>
  </Step>
</Steps>

## Additional Steps to Add Custom Objects in the Business Process Definition

<Steps>
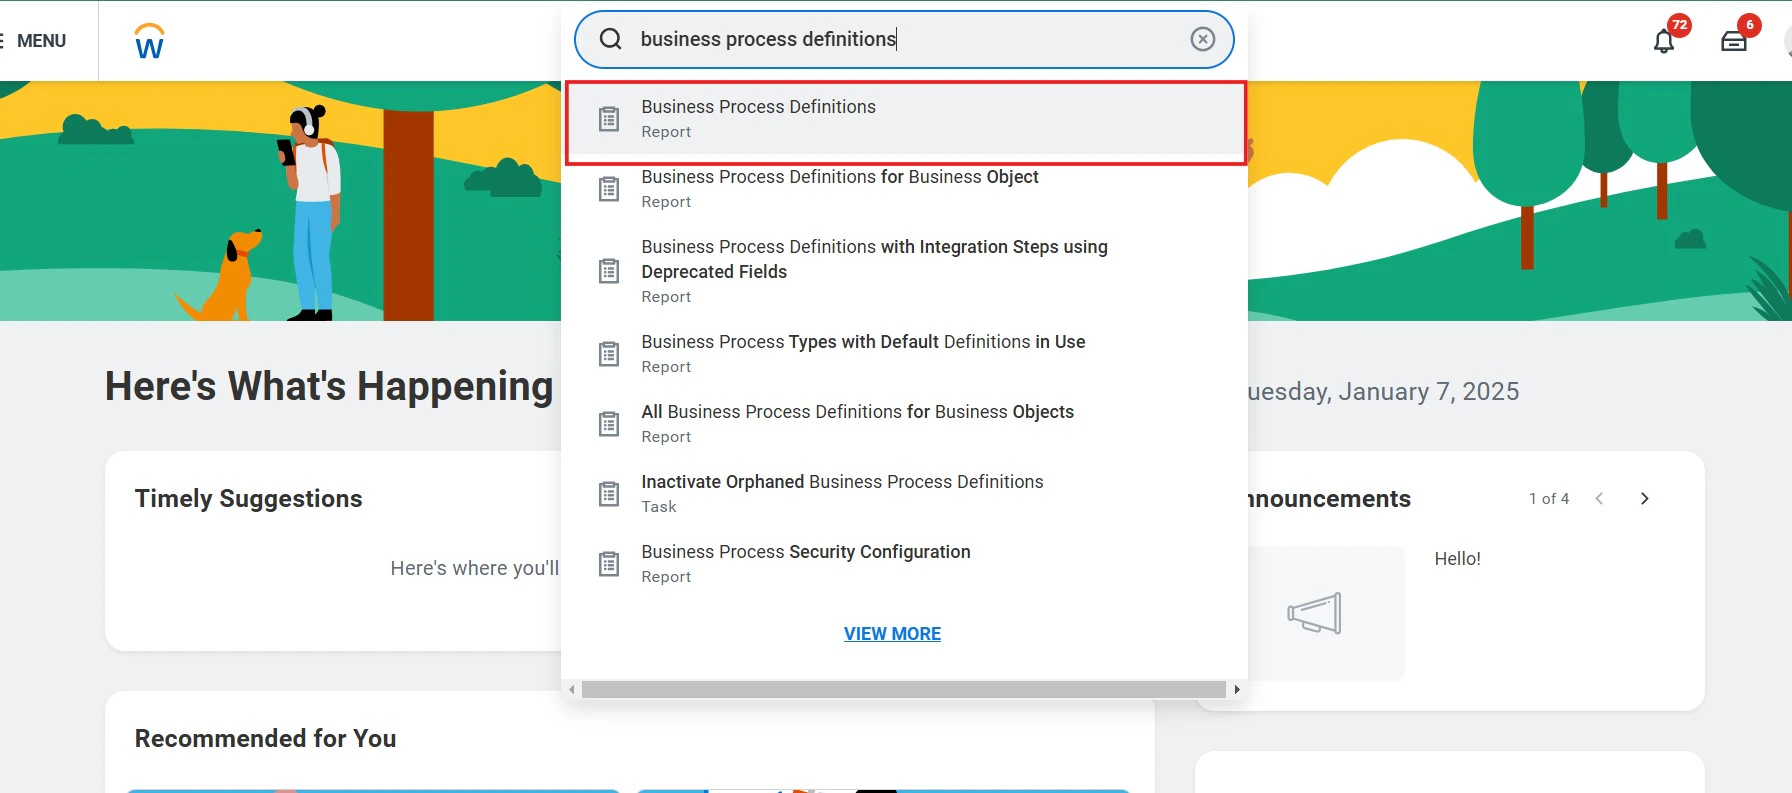
  <Step title="Search for 'Business Process Definitions'">
    Search for <b>Business Process Definitions</b> in the search bar and select it.

    <Frame>
      <img className="rounded-md" style={{ margin: '0 auto', border: '1px solid #efefef' }} alt="Search Business Process Definitions" src="https://mintcdn.com/stackone-hub-claude-issue-384-20260409-1436/EAY-SbLkvyoWwFJm/images/workday/custom-field/custom-field-10.jpg?fit=max&auto=format&n=EAY-SbLkvyoWwFJm&q=85&s=92cd171bf1c1687254bc9069306d72b4" width="1792" height="793" data-path="images/workday/custom-field/custom-field-10.jpg" />
    </Frame>
  </Step>

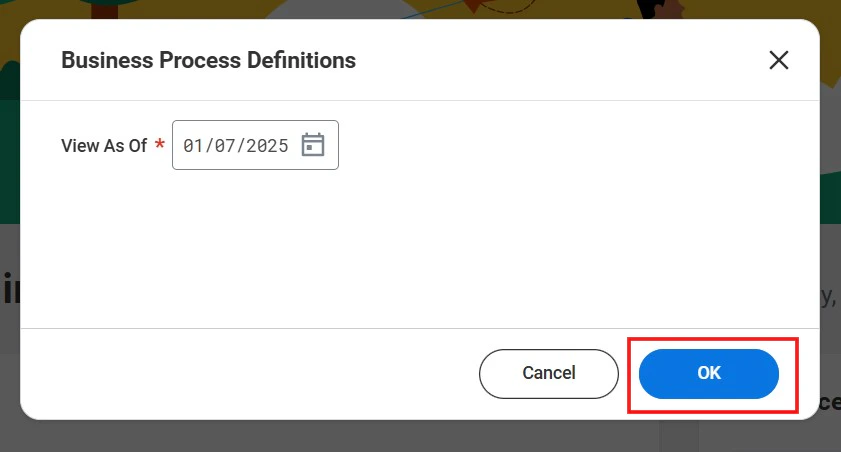
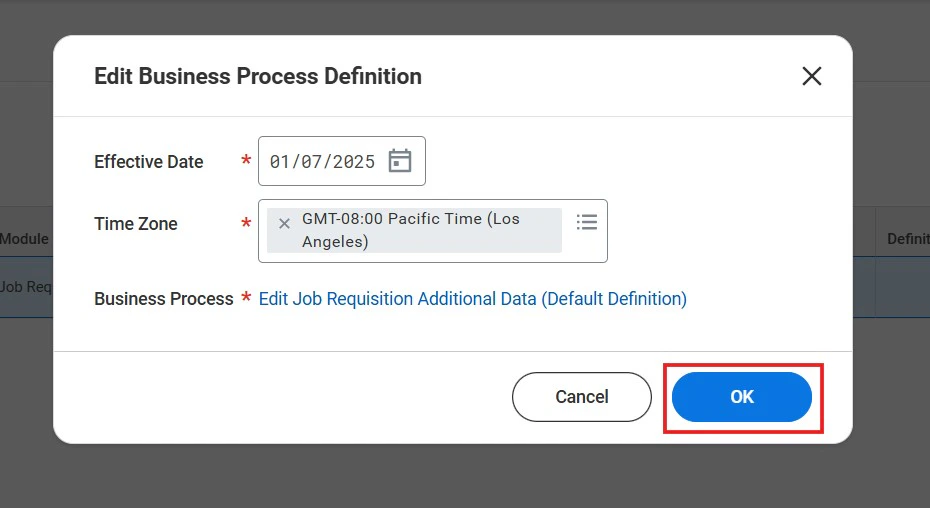
  <Step title="Click 'OK'">
    <Frame>
      <img className="rounded-md" style={{ margin: '0 auto', border: '1px solid #efefef' }} alt="Click OK" src="https://mintcdn.com/stackone-hub-claude-issue-384-20260409-1436/EAY-SbLkvyoWwFJm/images/workday/custom-field/custom-field-11.png?fit=max&auto=format&n=EAY-SbLkvyoWwFJm&q=85&s=f86d41cdffff263bc858d131b514435e" width="841" height="452" data-path="images/workday/custom-field/custom-field-11.png" />
    </Frame>
  </Step>

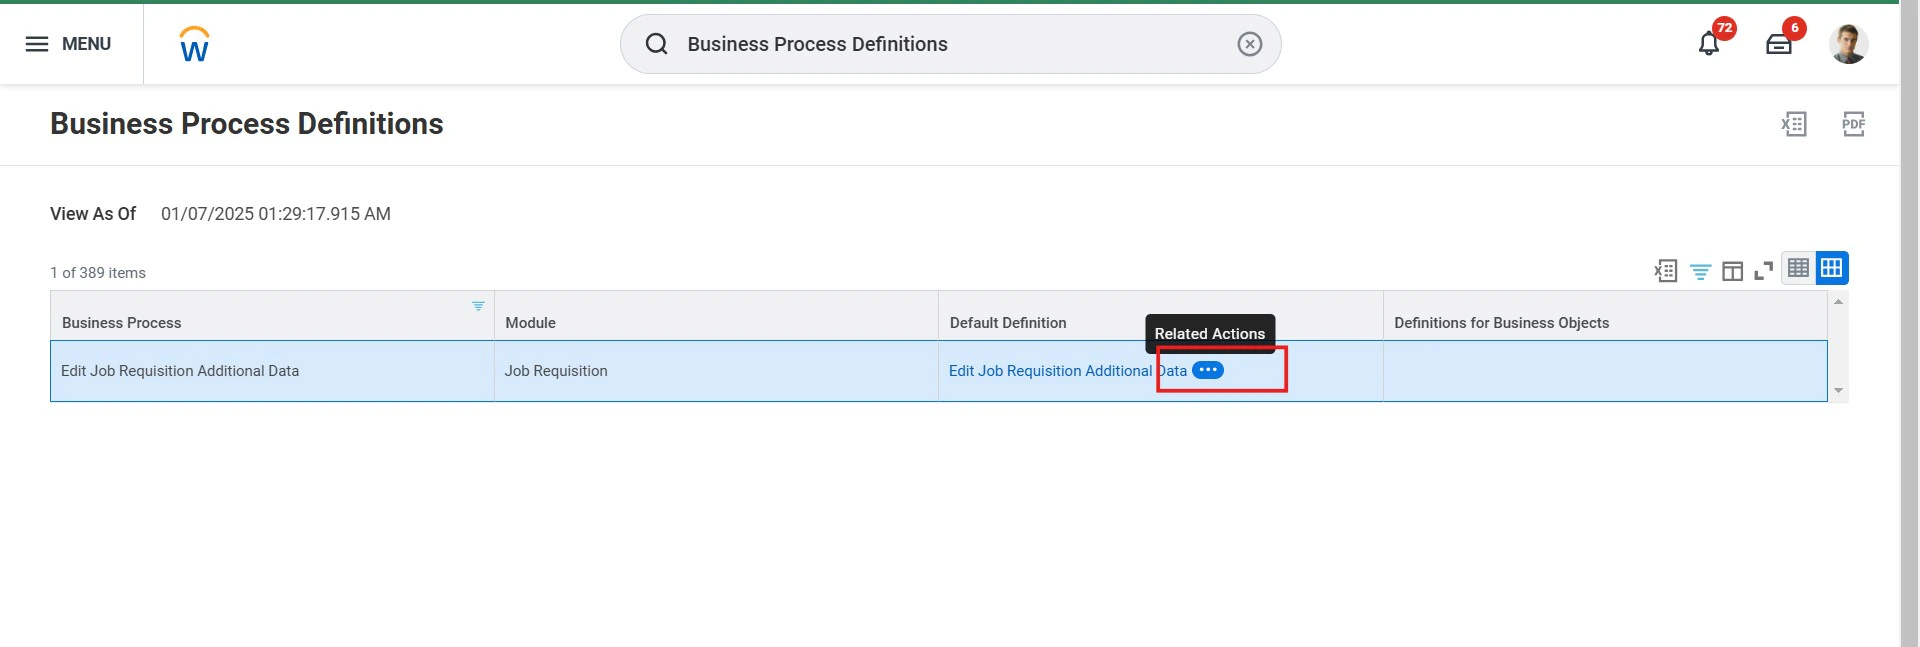
  <Step title="Find and Edit Business Process Definition">
    Find <b>Edit Job Requisition Additional Data</b> business process. Click the three dots (...) in the Default Definition column of the Edit Job Requisition Additional Data.
    <Frame>
      <img className="rounded-md" style={{ margin: '0 auto', border: '1px solid #efefef' }} alt="Find and Edit Business Process Definition" src="https://mintcdn.com/stackone-hub-claude-issue-384-20260409-1436/EAY-SbLkvyoWwFJm/images/workday/custom-field/custom-field-12.jpg?fit=max&auto=format&n=EAY-SbLkvyoWwFJm&q=85&s=3af345c782bda7ac58d7b2f19f18b24d" width="1920" height="647" data-path="images/workday/custom-field/custom-field-12.jpg" />
    </Frame>
  </Step>

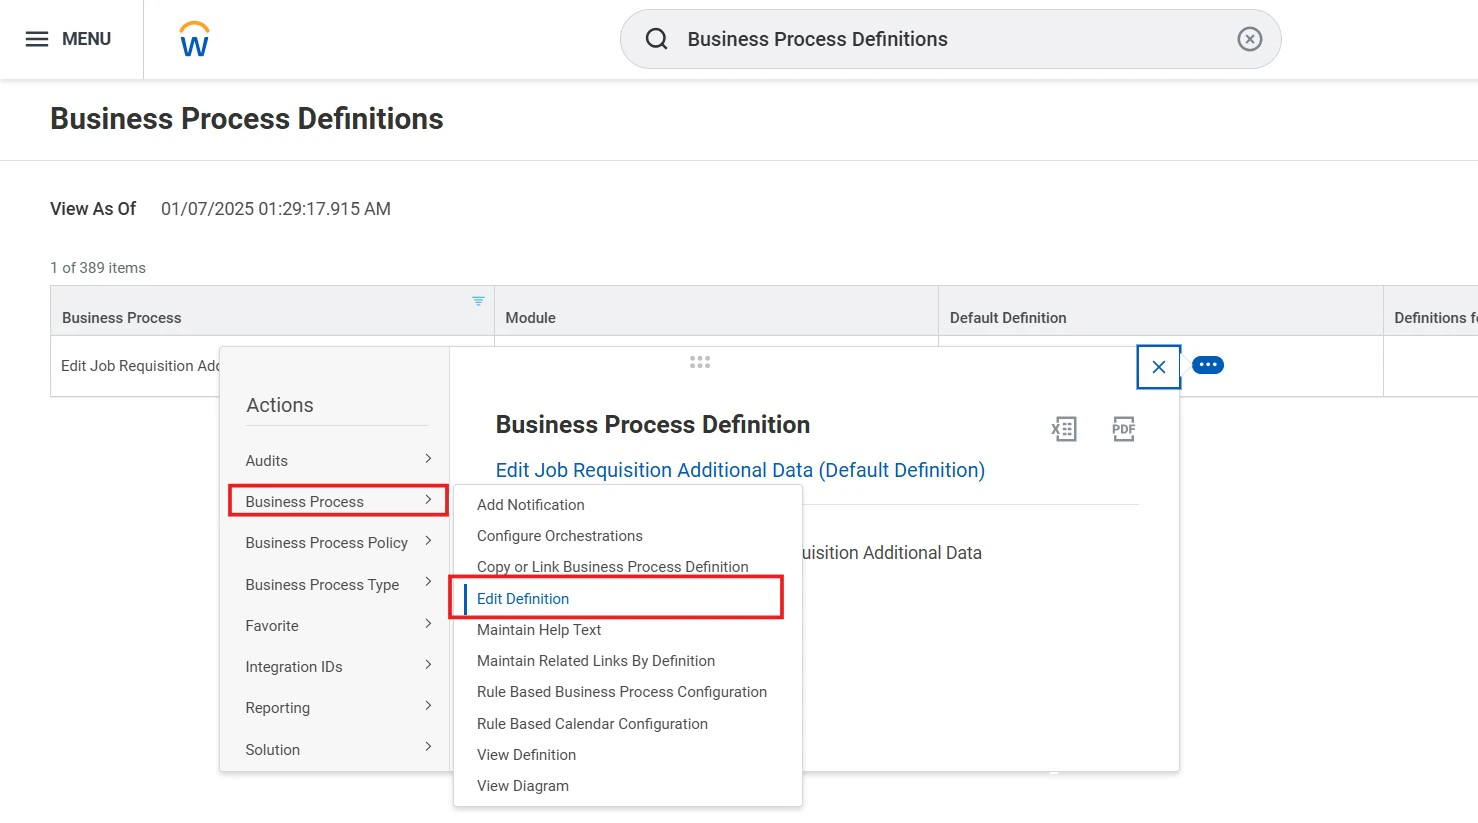
  <Step title="Click 'Edit Definition'">
    Click <b>Edit Definition</b> under the Business Process tab.

    <Frame>
      <img className="rounded-md" style={{ margin: '0 auto', border: '1px solid #efefef' }} alt="Edit Definition" src="https://mintcdn.com/stackone-hub-claude-issue-384-20260409-1436/EAY-SbLkvyoWwFJm/images/workday/custom-field/custom-field-13.jpg?fit=max&auto=format&n=EAY-SbLkvyoWwFJm&q=85&s=93324c54ae1806146689078e9d54b202" width="1478" height="823" data-path="images/workday/custom-field/custom-field-13.jpg" />
    </Frame>
  </Step>

  <Step title="Click 'OK'">
    <Frame>
      <img className="rounded-md" style={{ margin: '0 auto', border: '1px solid #efefef' }} alt="Click OK" src="https://mintcdn.com/stackone-hub-claude-issue-384-20260409-1436/EAY-SbLkvyoWwFJm/images/workday/custom-field/custom-field-14.jpg?fit=max&auto=format&n=EAY-SbLkvyoWwFJm&q=85&s=ede5fb69103011429f60b0132c599a60" width="930" height="508" data-path="images/workday/custom-field/custom-field-14.jpg" />
    </Frame>
  </Step>

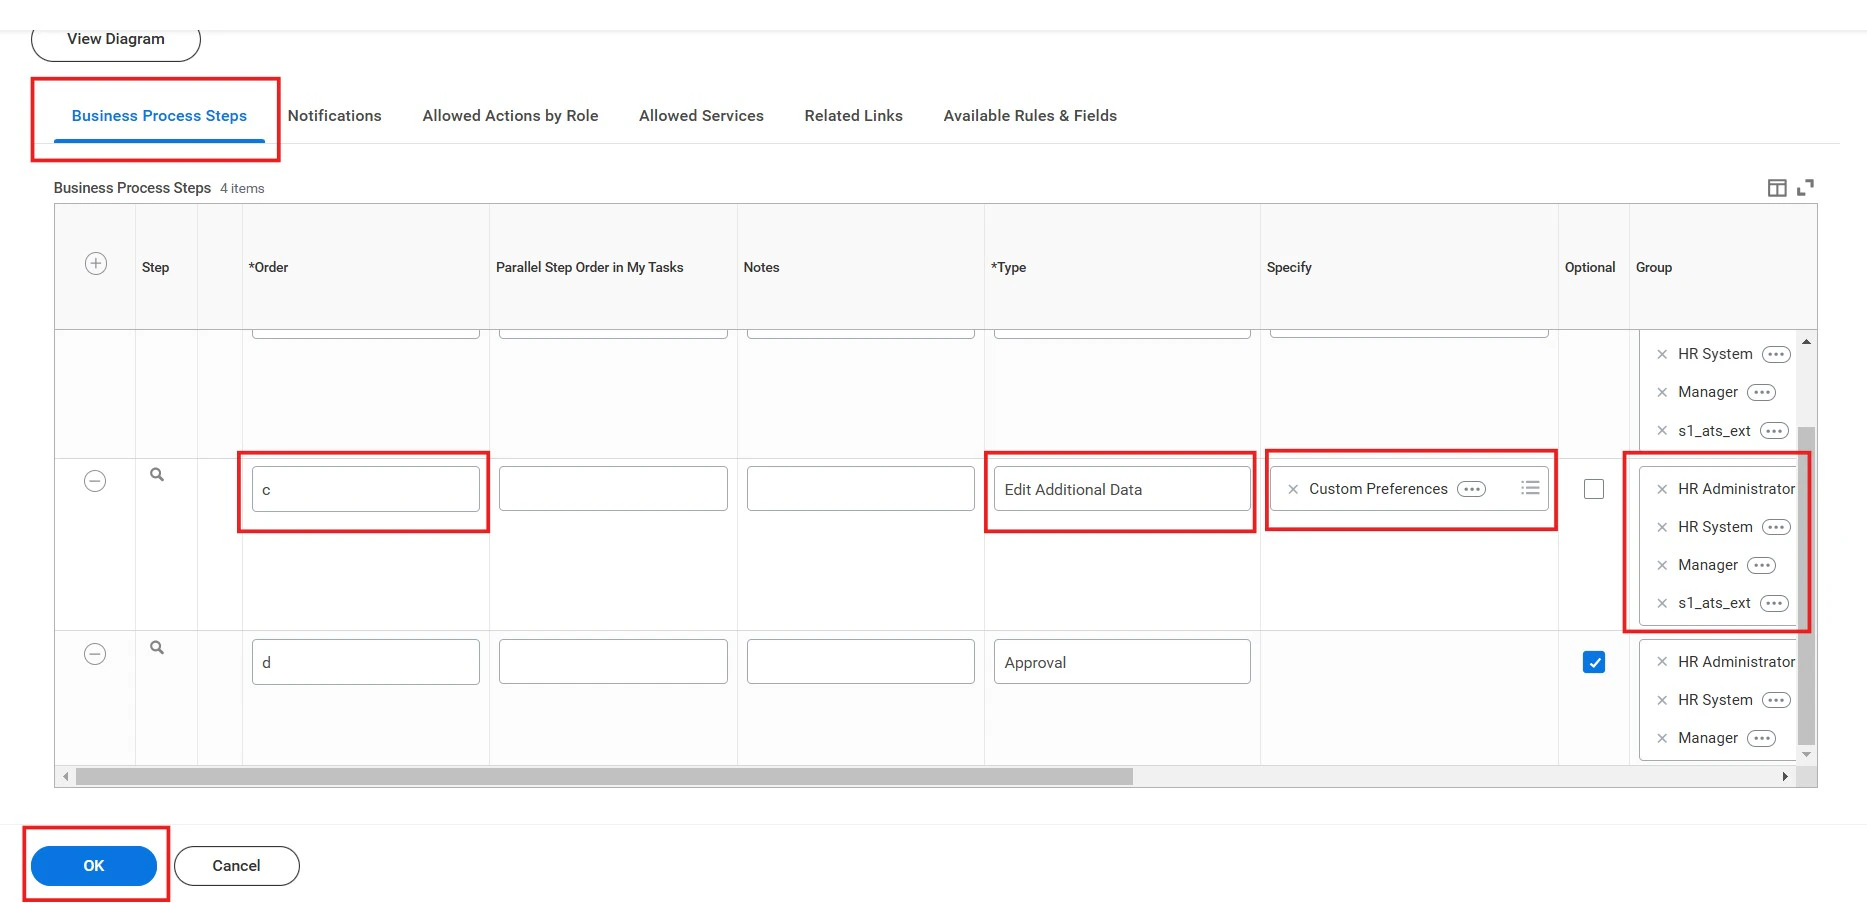
  <Step title="Configure Business Process Steps">
    In the Business Process Steps tab:

    <ul>
      <li>Enter the order alphabetically in the Order column.</li>
      <li>Select <b>Edit Additional Data</b> in the Type column.</li>
      <li>Choose the newly created custom object in the Specify column.</li>
      <li>Assign the relevant security groups in the Group column.</li>
      <li>Click "OK"</li>
    </ul>

    <Frame>
      <img className="rounded-md" style={{ margin: '0 auto', border: '1px solid #efefef' }} alt="Configure Business Process Steps" src="https://mintcdn.com/stackone-hub-claude-issue-384-20260409-1436/EAY-SbLkvyoWwFJm/images/workday/custom-field/custom-field-15.jpg?fit=max&auto=format&n=EAY-SbLkvyoWwFJm&q=85&s=863cad07644b48d8d2b2362642e180c6" width="1867" height="903" data-path="images/workday/custom-field/custom-field-15.jpg" />
    </Frame>
  </Step>

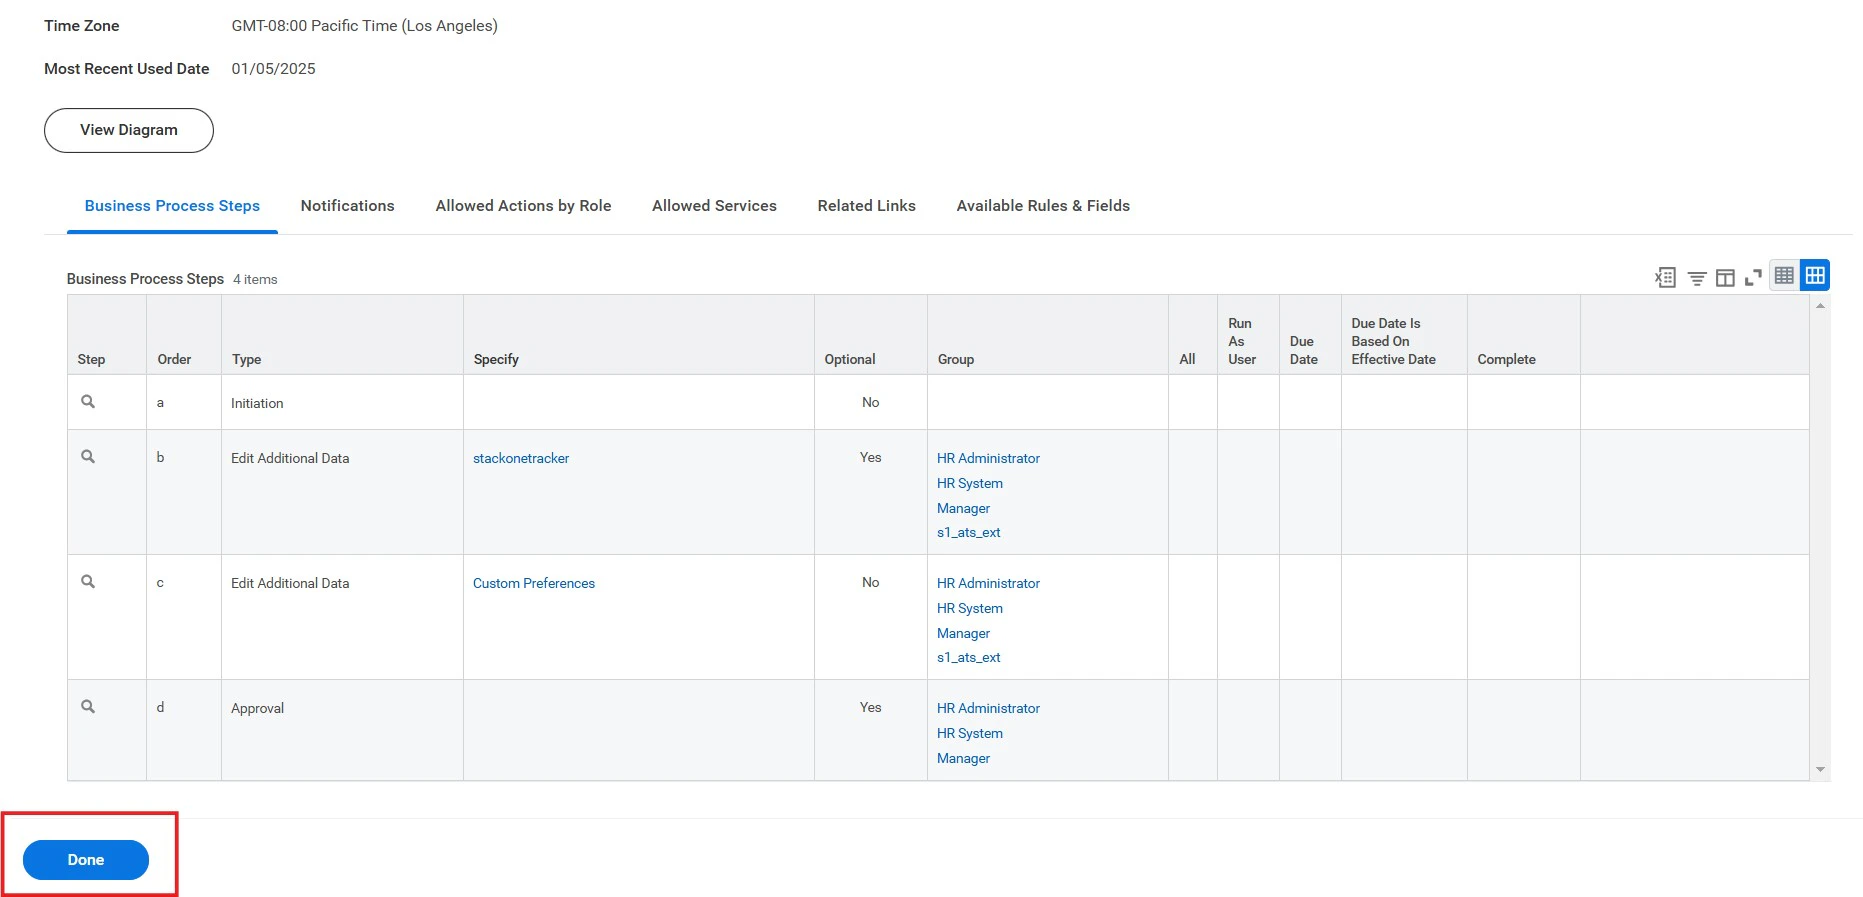
  <Step title="Verify and Complete">
    Verify and Click <b>Done</b>.

    <Frame>
      <img className="rounded-md" style={{ margin: '0 auto', border: '1px solid #efefef' }} alt="Verify and Complete" src="https://mintcdn.com/stackone-hub-claude-issue-384-20260409-1436/EAY-SbLkvyoWwFJm/images/workday/custom-field/custom-field-16.jpg?fit=max&auto=format&n=EAY-SbLkvyoWwFJm&q=85&s=be8690b5de83cad745deb117eb505a72" width="1863" height="897" data-path="images/workday/custom-field/custom-field-16.jpg" />
    </Frame>
  </Step>
</Steps>

<Note>
  Note: Changes to Job Effective-Dated Custom Field values made through the API must be approved via the UI.
</Note>

<br />

Congratulations, you're all set! If you face any issues with the steps mentioned above,
please contact us by emailing [integrations@stackone.com](mailto:integrations@stackone.com). We're always here to assist you!