> ## Documentation Index
> Fetch the complete documentation index at: https://stackone-hub-claude-issue-384-20260409-1436.mintlify.site/llms.txt
> Use this file to discover all available pages before exploring further.

# Qlik - OAuth Authentication

> Follow these steps to connect Qlik via the StackOne Hub successfully.

<Warning>
  Ensure you have Admin privileges within your Qlik Cloud.
</Warning>

If you've been directed to StackOne to integrate with Qlik, the following steps will help you understand the process and any necessary actions to configure successful integration.

## Get Your Qlik Tenant

<Steps>
  <Step title="Log in to Qlik Cloud">
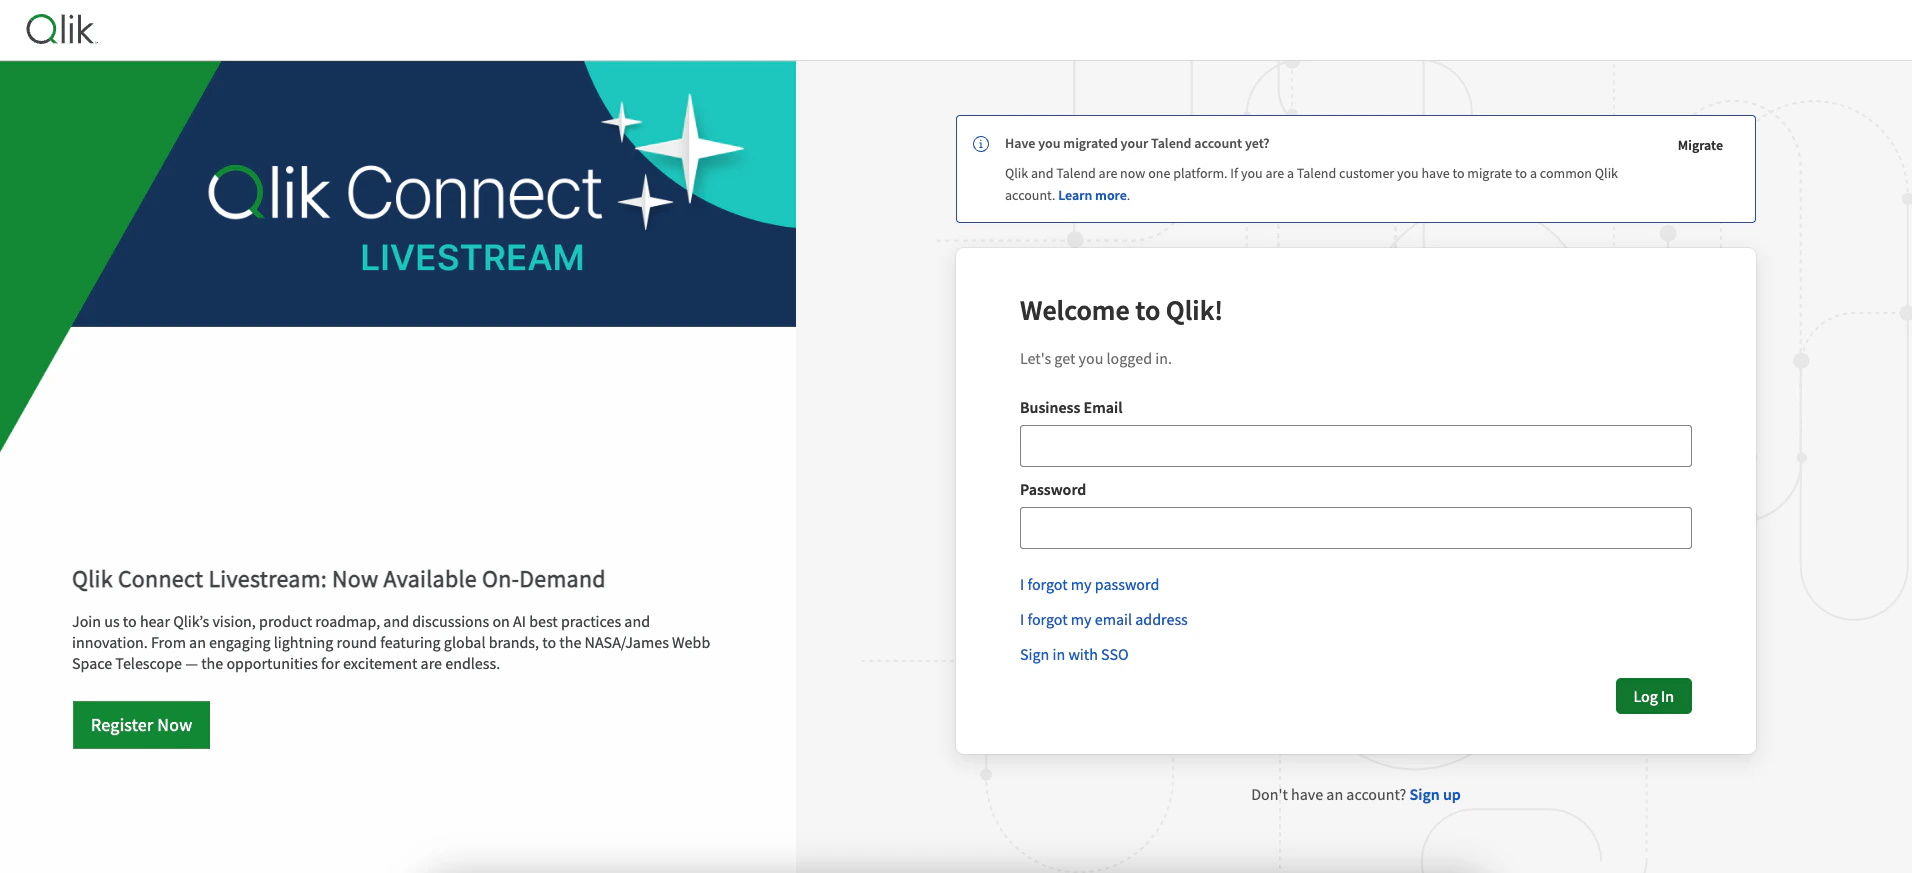
    Log in to your [Qlik Cloud](https://qlikcloud.com/). Your Tenant is found in the URL.
    <Frame>
      <img className="rounded-md" style={{ margin: '0 auto', border: '1px solid #efefef' }} alt="Log in to the Qlik Cloud" src="https://mintcdn.com/stackone-hub-claude-issue-384-20260409-1436/fIC4erPUQXS94q1m/images/qlik/image1.png?fit=max&auto=format&n=fIC4erPUQXS94q1m&q=85&s=a374d2f70e305ee02ca8c3c7e586f1fd" width="1912" height="873" data-path="images/qlik/image1.png" />
    </Frame>

    Given the URL: `https://my-tenant.eu.qlikcloud.com/hub`

    The Tenant is `my-tenant`.
  </Step>
</Steps>

## Get your Qlik Client ID and Secret

<Steps>
  <Step title="Navigate to Management Console">
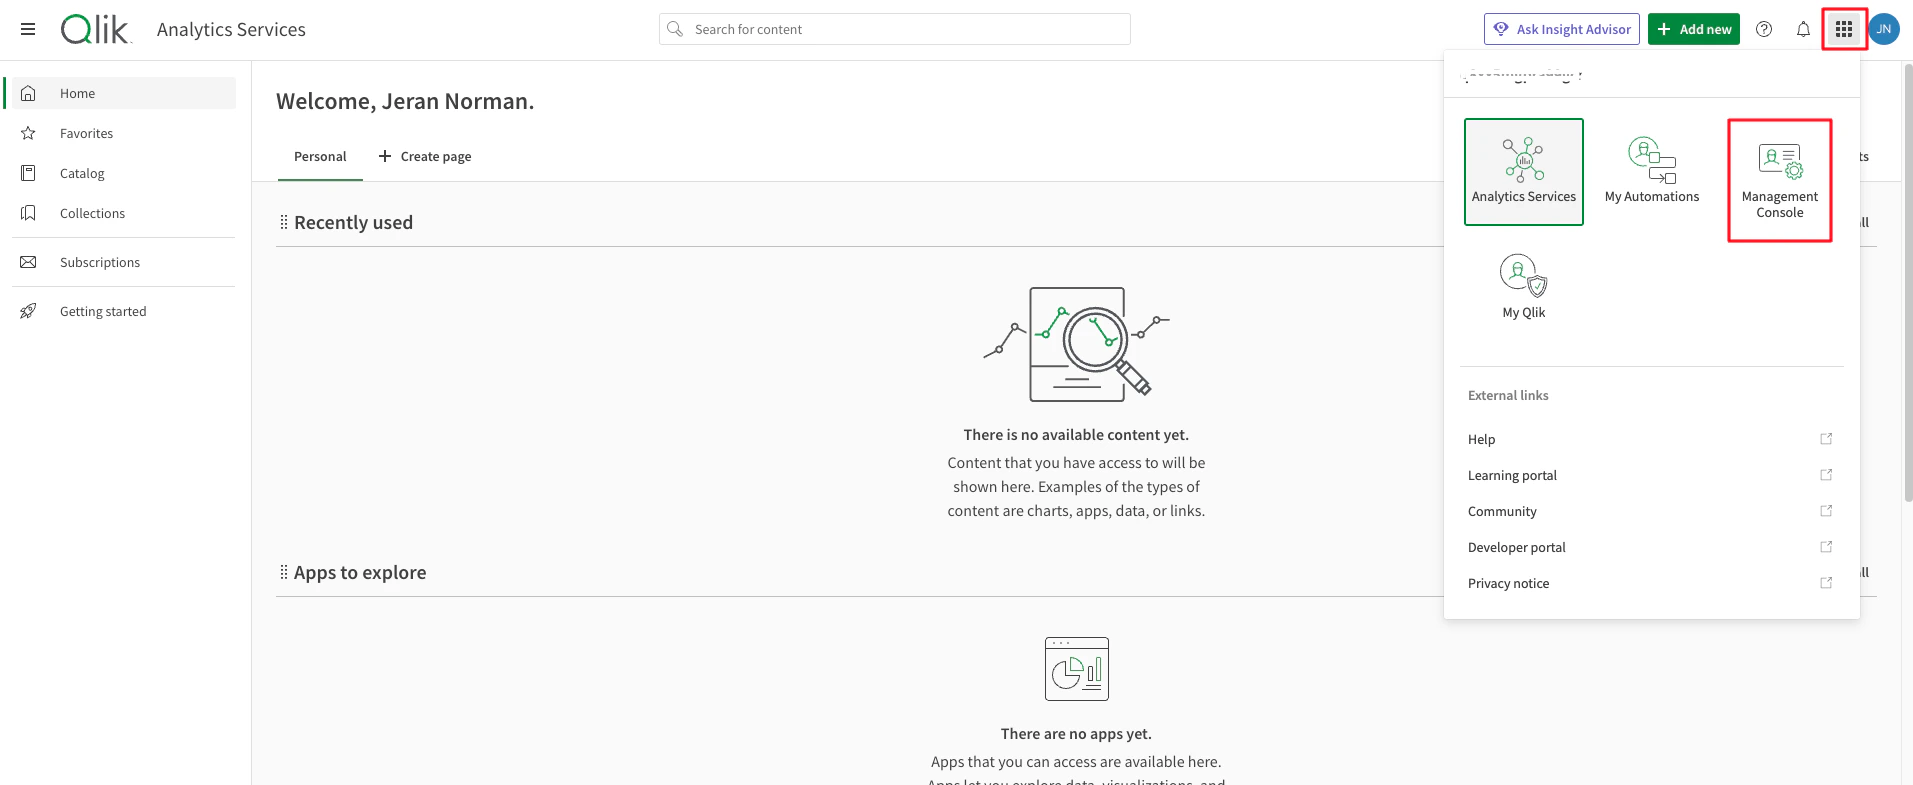
    Click on the Launcher menu button at the top right corner and select `Management Console`.
    <Frame>
      <img className="rounded-md" style={{ margin: '0 auto', border: '1px solid #efefef' }} alt="Management Console" src="https://mintcdn.com/stackone-hub-claude-issue-384-20260409-1436/fIC4erPUQXS94q1m/images/qlik-oauth/image1.png?fit=max&auto=format&n=fIC4erPUQXS94q1m&q=85&s=77fb6f25dd745f7adf61934a4d369ed7" width="1913" height="785" data-path="images/qlik-oauth/image1.png" />
    </Frame>
  </Step>

  <Step title="OAuth">
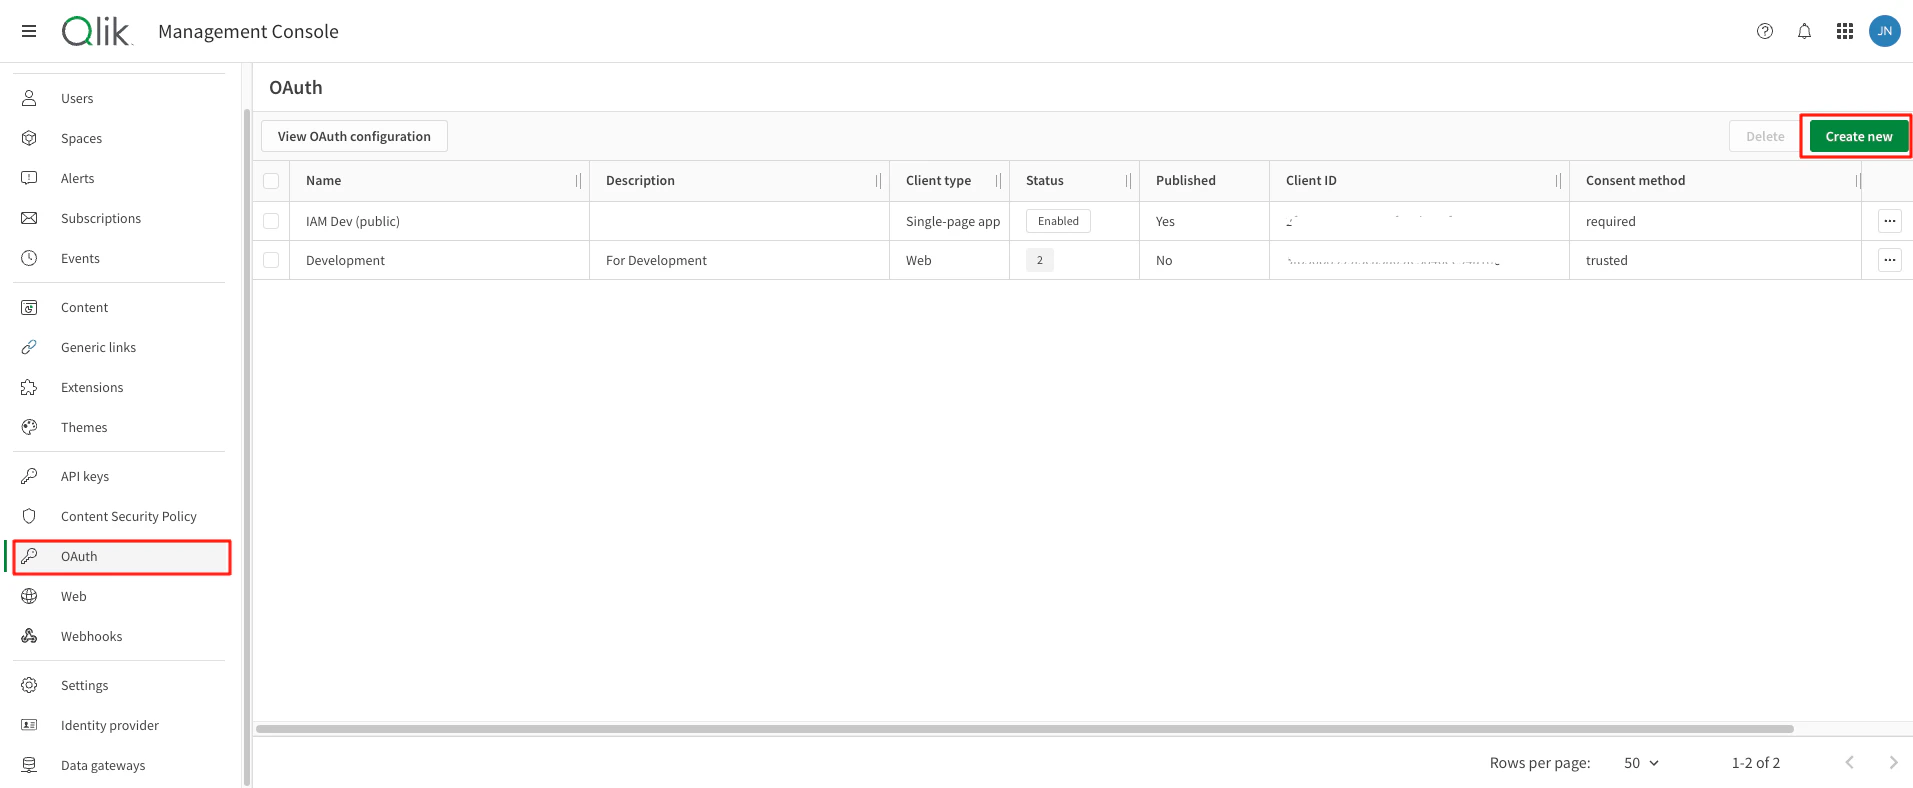
    Go to `OAuth` from the left menu and click on `Create new`.
    <Frame>
      <img className="rounded-md" style={{ margin: '0 auto', border: '1px solid #efefef' }} alt="OAuth" src="https://mintcdn.com/stackone-hub-claude-issue-384-20260409-1436/fIC4erPUQXS94q1m/images/qlik-oauth/image2.png?fit=max&auto=format&n=fIC4erPUQXS94q1m&q=85&s=bee14d98cf1766add106a8fda0194023" width="1913" height="788" data-path="images/qlik-oauth/image2.png" />
    </Frame>
  </Step>

  <Step title="Enter OAuth client details">
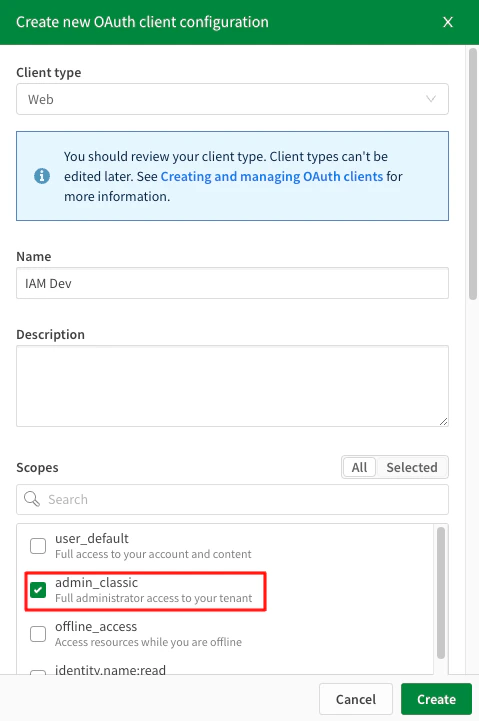
    Select Client type and enter the new OAuth client name and description. Then check the box next to `admin_classic` scope from scopes list.
    <Frame>
      <img className="rounded-md" style={{ margin: '0 auto', border: '1px solid #efefef' }} alt="OAuth Details" src="https://mintcdn.com/stackone-hub-claude-issue-384-20260409-1436/fIC4erPUQXS94q1m/images/qlik-oauth/image3.png?fit=max&auto=format&n=fIC4erPUQXS94q1m&q=85&s=0ba9acd6457d13778b99ab242a1bb67d" width="479" height="721" data-path="images/qlik-oauth/image3.png" />
    </Frame>
  </Step>

  <Step title="Add redirect URLs">
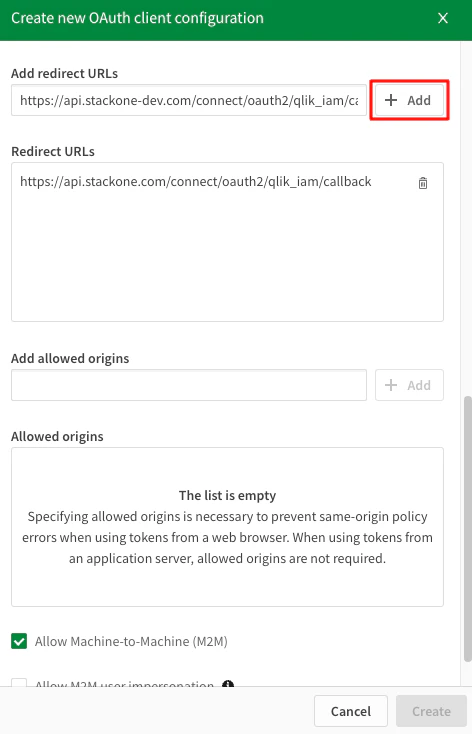
    Enter redirect URL and click on `Add` button. It should be listed below in `Redirect URLs` section.
    <Frame>
      <img className="rounded-md" style={{ margin: '0 auto', border: '1px solid #efefef' }} alt="OAuth Details" src="https://mintcdn.com/stackone-hub-claude-issue-384-20260409-1436/fIC4erPUQXS94q1m/images/qlik-oauth/image4.png?fit=max&auto=format&n=fIC4erPUQXS94q1m&q=85&s=f85990a3df3020583f45984c3c03d22f" width="472" height="734" data-path="images/qlik-oauth/image4.png" />
    </Frame>
  </Step>

  <Step title="Allow Machine-to-Machine">
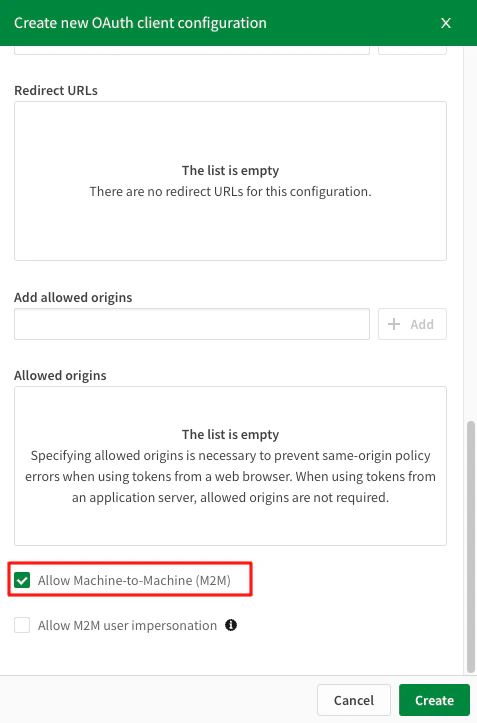
    Scroll down and check the box next to `Allow Machine-to-Machine (M2M)` and click on `Create` button.
    <Frame>
      <img className="rounded-md" style={{ margin: '0 auto', border: '1px solid #efefef' }} alt="OAuth Details" src="https://mintcdn.com/stackone-hub-claude-issue-384-20260409-1436/fIC4erPUQXS94q1m/images/qlik-oauth/image5.png?fit=max&auto=format&n=fIC4erPUQXS94q1m&q=85&s=3a282d28e83e6062ffb8cbcfedd15470" width="477" height="723" data-path="images/qlik-oauth/image5.png" />
    </Frame>
  </Step>

  <Step title="Copy Client ID and Secret">
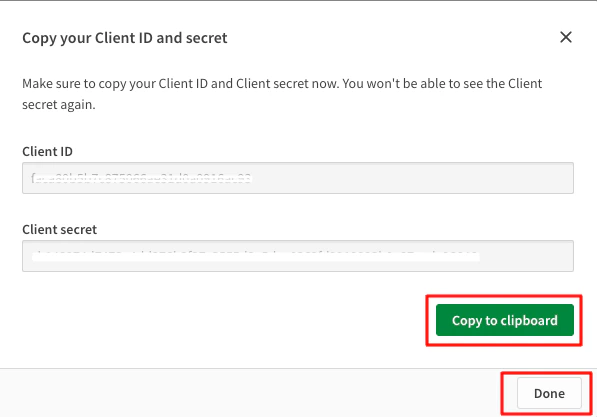
    Copy your Client ID and Secret to a safe place by clicking `Copy to clipboard`. These will be used in the next step. Click <b>Done</b> in the bottom once complete.

    <Frame>
      <img className="rounded-md" style={{ margin: '0 auto', border: '1px solid #efefef' }} alt="Copy Credentials" src="https://mintcdn.com/stackone-hub-claude-issue-384-20260409-1436/fIC4erPUQXS94q1m/images/qlik-oauth/image6.png?fit=max&auto=format&n=fIC4erPUQXS94q1m&q=85&s=e98407d91fe8dd4eb0dc480eb8c32144" width="597" height="417" data-path="images/qlik-oauth/image6.png" />
    </Frame>
  </Step>
</Steps>

## Change consent method

<Steps>
  <Step title="Edit consent method">
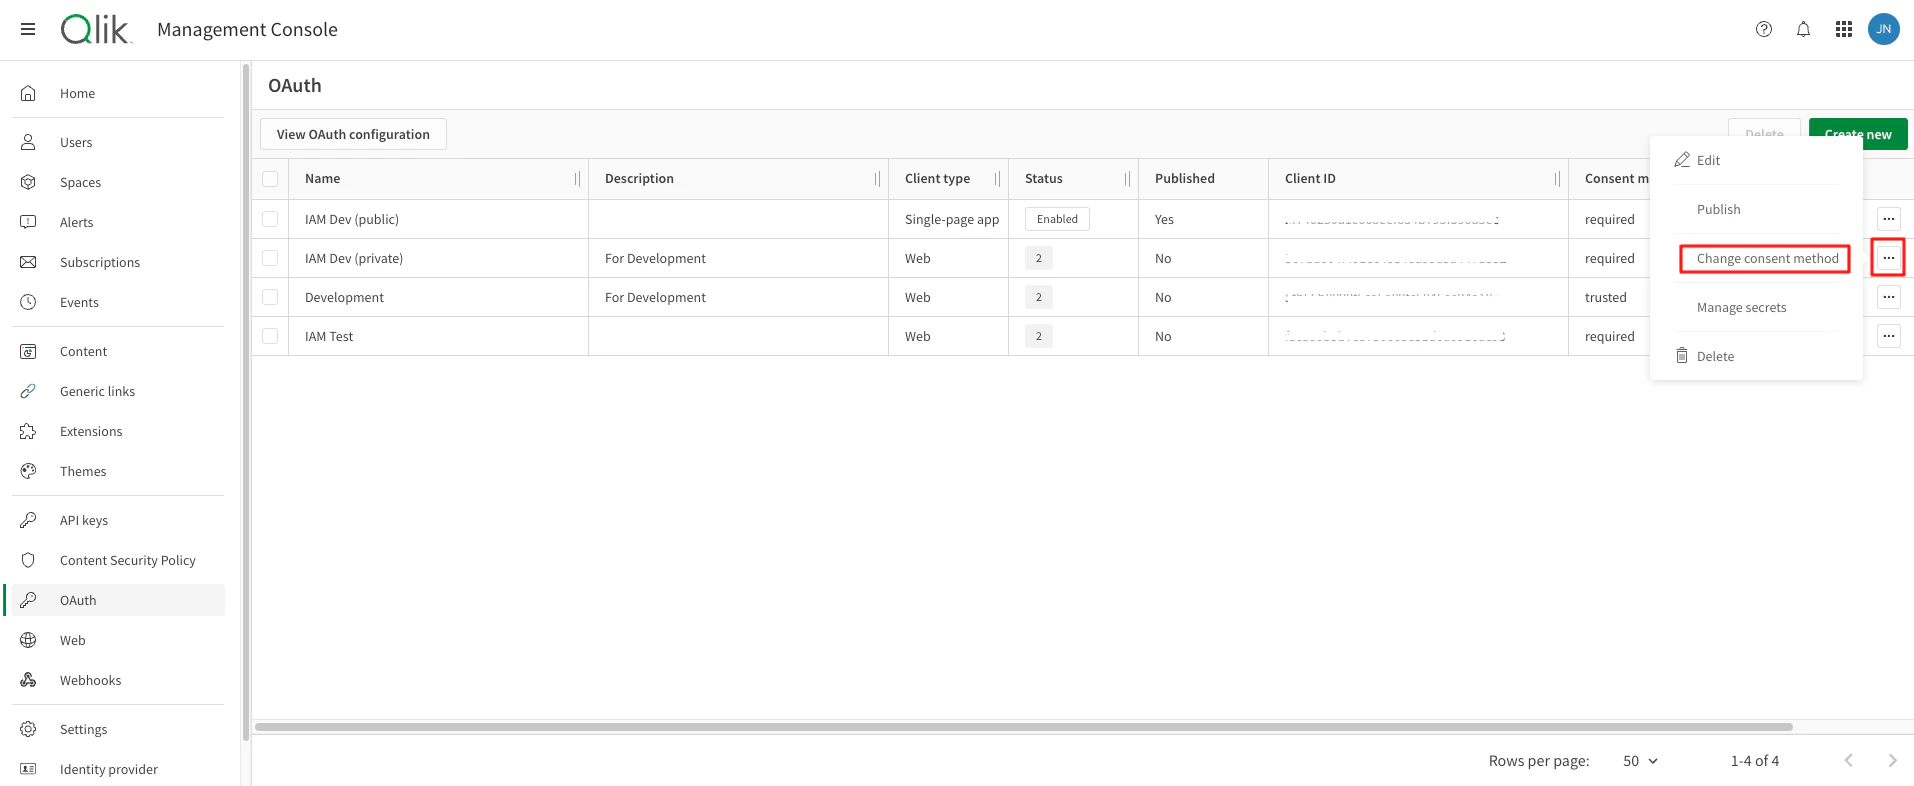
    Click on the edit <Icon icon="ellipsis" /> button next to your Oauth client and select `Change consent method`.
    <Frame>
      <img className="rounded-md" style={{ margin: '0 auto', border: '1px solid #efefef' }} alt="Log in to the Qlik Cloud" src="https://mintcdn.com/stackone-hub-claude-issue-384-20260409-1436/fIC4erPUQXS94q1m/images/qlik-oauth/image7.png?fit=max&auto=format&n=fIC4erPUQXS94q1m&q=85&s=4ce071e718baca92a14aaec5996ec3d4" width="1914" height="786" data-path="images/qlik-oauth/image7.png" />
    </Frame>
  </Step>

  <Step title="Change consent method to Trusted">
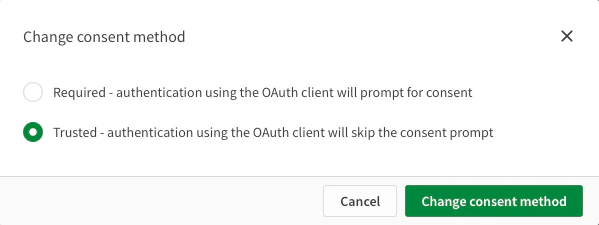
    Select the <Icon icon="circle-dot" iconType="solid" /> `Trusted` radio button and then click `Change consent method`.
    <Frame>
      <img className="rounded-md" style={{ margin: '0 auto', border: '1px solid #efefef' }} alt="Change consent method dialog" src="https://mintcdn.com/stackone-hub-claude-issue-384-20260409-1436/fIC4erPUQXS94q1m/images/qlik-oauth/image8.png?fit=max&auto=format&n=fIC4erPUQXS94q1m&q=85&s=c5deba3abde9ef1ec9b67abbcbceb67d" width="599" height="225" data-path="images/qlik-oauth/image8.png" />
    </Frame>
  </Step>
</Steps>

## Connecting with StackOne

<Steps>
  <Step title="Enter Credentials">
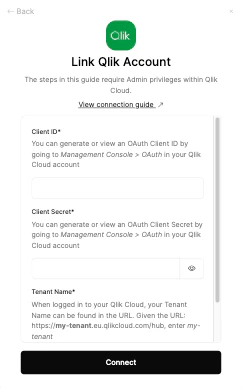
    Upon reaching the Link Account page, enter the Client ID, Clients Secret and tenant name from the previous steps and proceed by clicking the <b>Connect</b> button.

    <Frame>
      <img className="rounded-md" style={{ margin: '0 auto', border: '1px solid #efefef' }} alt="Link Account" src="https://mintcdn.com/stackone-hub-claude-issue-384-20260409-1436/fIC4erPUQXS94q1m/images/qlik-oauth/image9.png?fit=max&auto=format&n=fIC4erPUQXS94q1m&q=85&s=6ae11b7bedf97c16ac8fb78d13508f7b" width="242" height="388" data-path="images/qlik-oauth/image9.png" />
    </Frame>
  </Step>
</Steps>

<br />

Congratulations, you're all set! If you face any issues with the steps mentioned above,
please contact us by emailing [integrations@stackone.com](mailto:integrations@stackone.com). We're always here to assist you!

## Available data

This integration has the following [IAM Resources](https://docs.stackone.com/reference/iam_list_users) available from the provider:

<ul>
  <li>Users</li>
  <li>Roles</li>
  <li>Groups</li>
</ul>

## Useful Links

<Card title="OAuth Overview" icon="link" href="https://qlik.dev/authenticate/oauth/">
  [https://qlik.dev/authenticate/oauth/](https://qlik.dev/authenticate/oauth/)
</Card>

<Card title="Create a new OAuth2 M2M client" icon="link" href="https://qlik.dev/authenticate/oauth/create/create-oauth-client/">
  [https://qlik.dev/authenticate/oauth/create/create-oauth-client/](https://qlik.dev/authenticate/oauth/create/create-oauth-client/)
</Card>