> ## Documentation Index
> Fetch the complete documentation index at: https://stackone-hub-claude-issue-384-20260409-1436.mintlify.site/llms.txt
> Use this file to discover all available pages before exploring further.
# UKG Ready (OAuth)
> Follow these steps to connect UKG Ready (OAuth) with StackOne Hub successfully.
Ensure you have Admin privileges for your UKG Ready account.
If you've been directed to StackOne to integrate with UKG Ready (OAuth), the following steps will help you understand the process and any necessary actions to configure successful integration.
## Getting your UKG Ready URL and Company Short Name
Once logged in, copy your **UKG Ready URL** from the address bar, ending with `.rdy.ukg.dev`. Store this to be used in a later step.
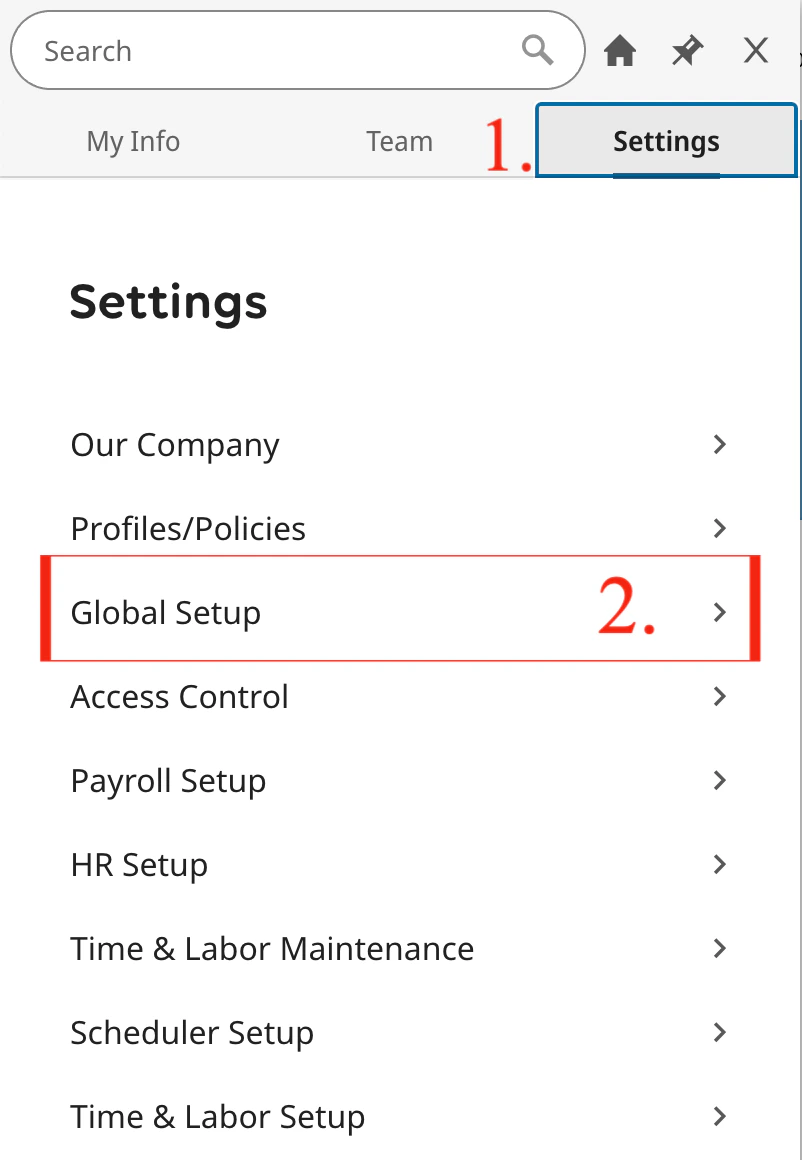
 Click `≡` at the top-left corner.
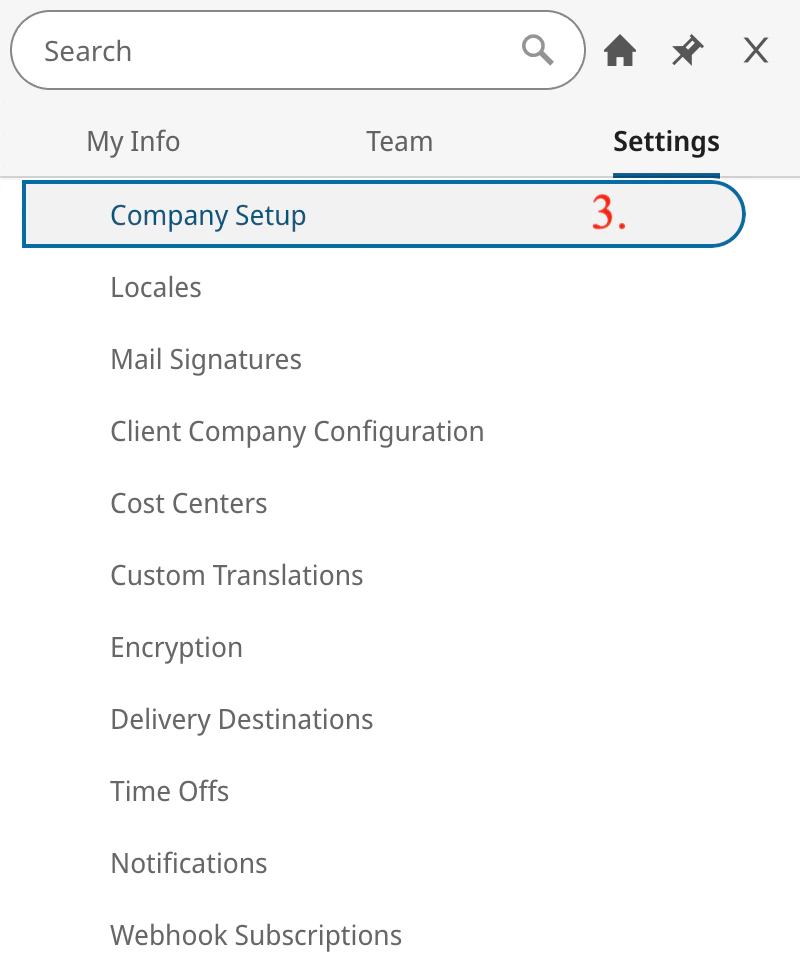
 Navigate to `Settings` > `Global Setup`
 then `Global Setup` > `Company Setup`
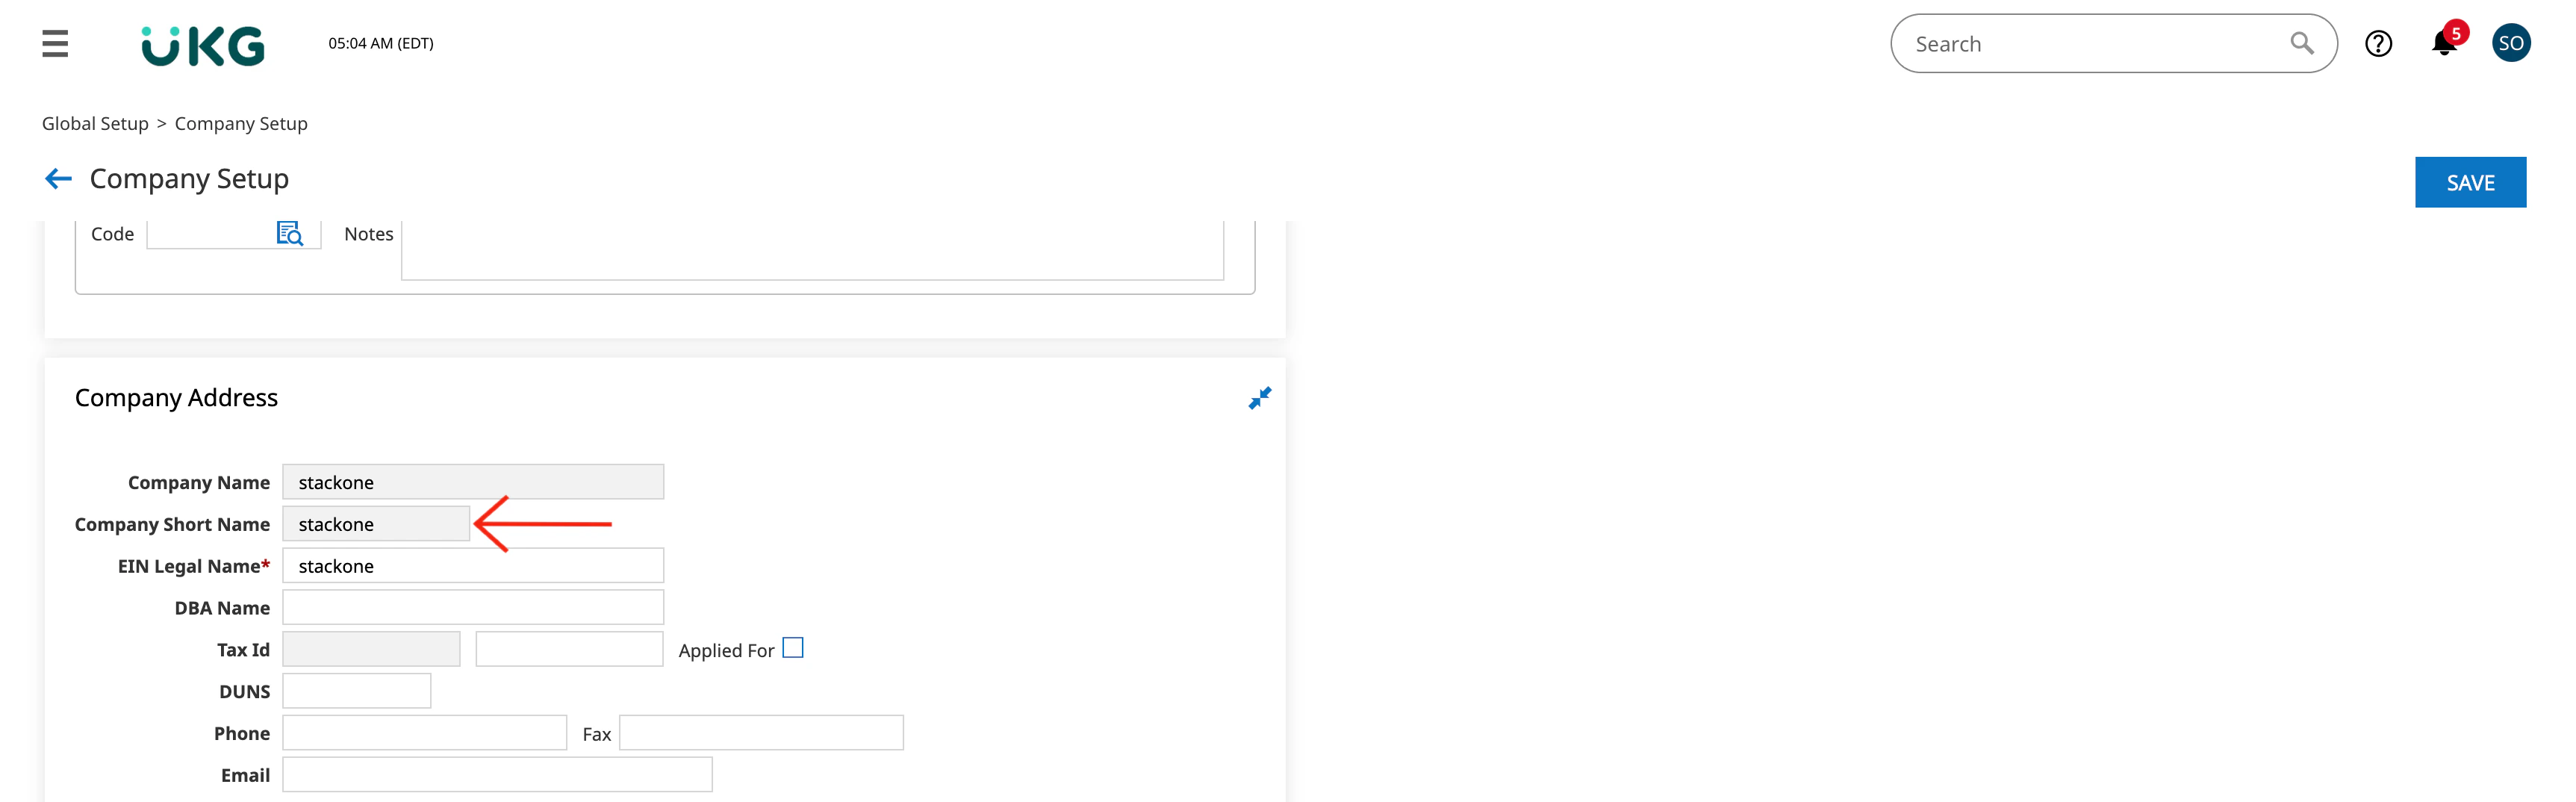
 Under `Company Setup` > `Company Info`, scroll down to the Company Address
section and copy the Company Short Name. If it is not available in that
section, please enter the Company Short Name and click `Save`
Under `Company Setup` > `Company Info`, scroll down to the Company Address
section and copy the Company Short Name. If it is not available in that
section, please enter the Company Short Name and click `Save`

 ## Enabling OAuth Applications in your dashboard
The option to generate OAuth credentials may not be available by default, and must be enabled to support this connection.
Under *Company Setup* Navigate to `Edit Tabs`.
## Enabling OAuth Applications in your dashboard
The option to generate OAuth credentials may not be available by default, and must be enabled to support this connection.
Under *Company Setup* Navigate to `Edit Tabs`.
 If you don't already see `OAuth Applications` in the column view - then from
the `Available Windows` section look for `OAuth Applications`
If you don't already see `OAuth Applications` in the column view - then from
the `Available Windows` section look for `OAuth Applications`
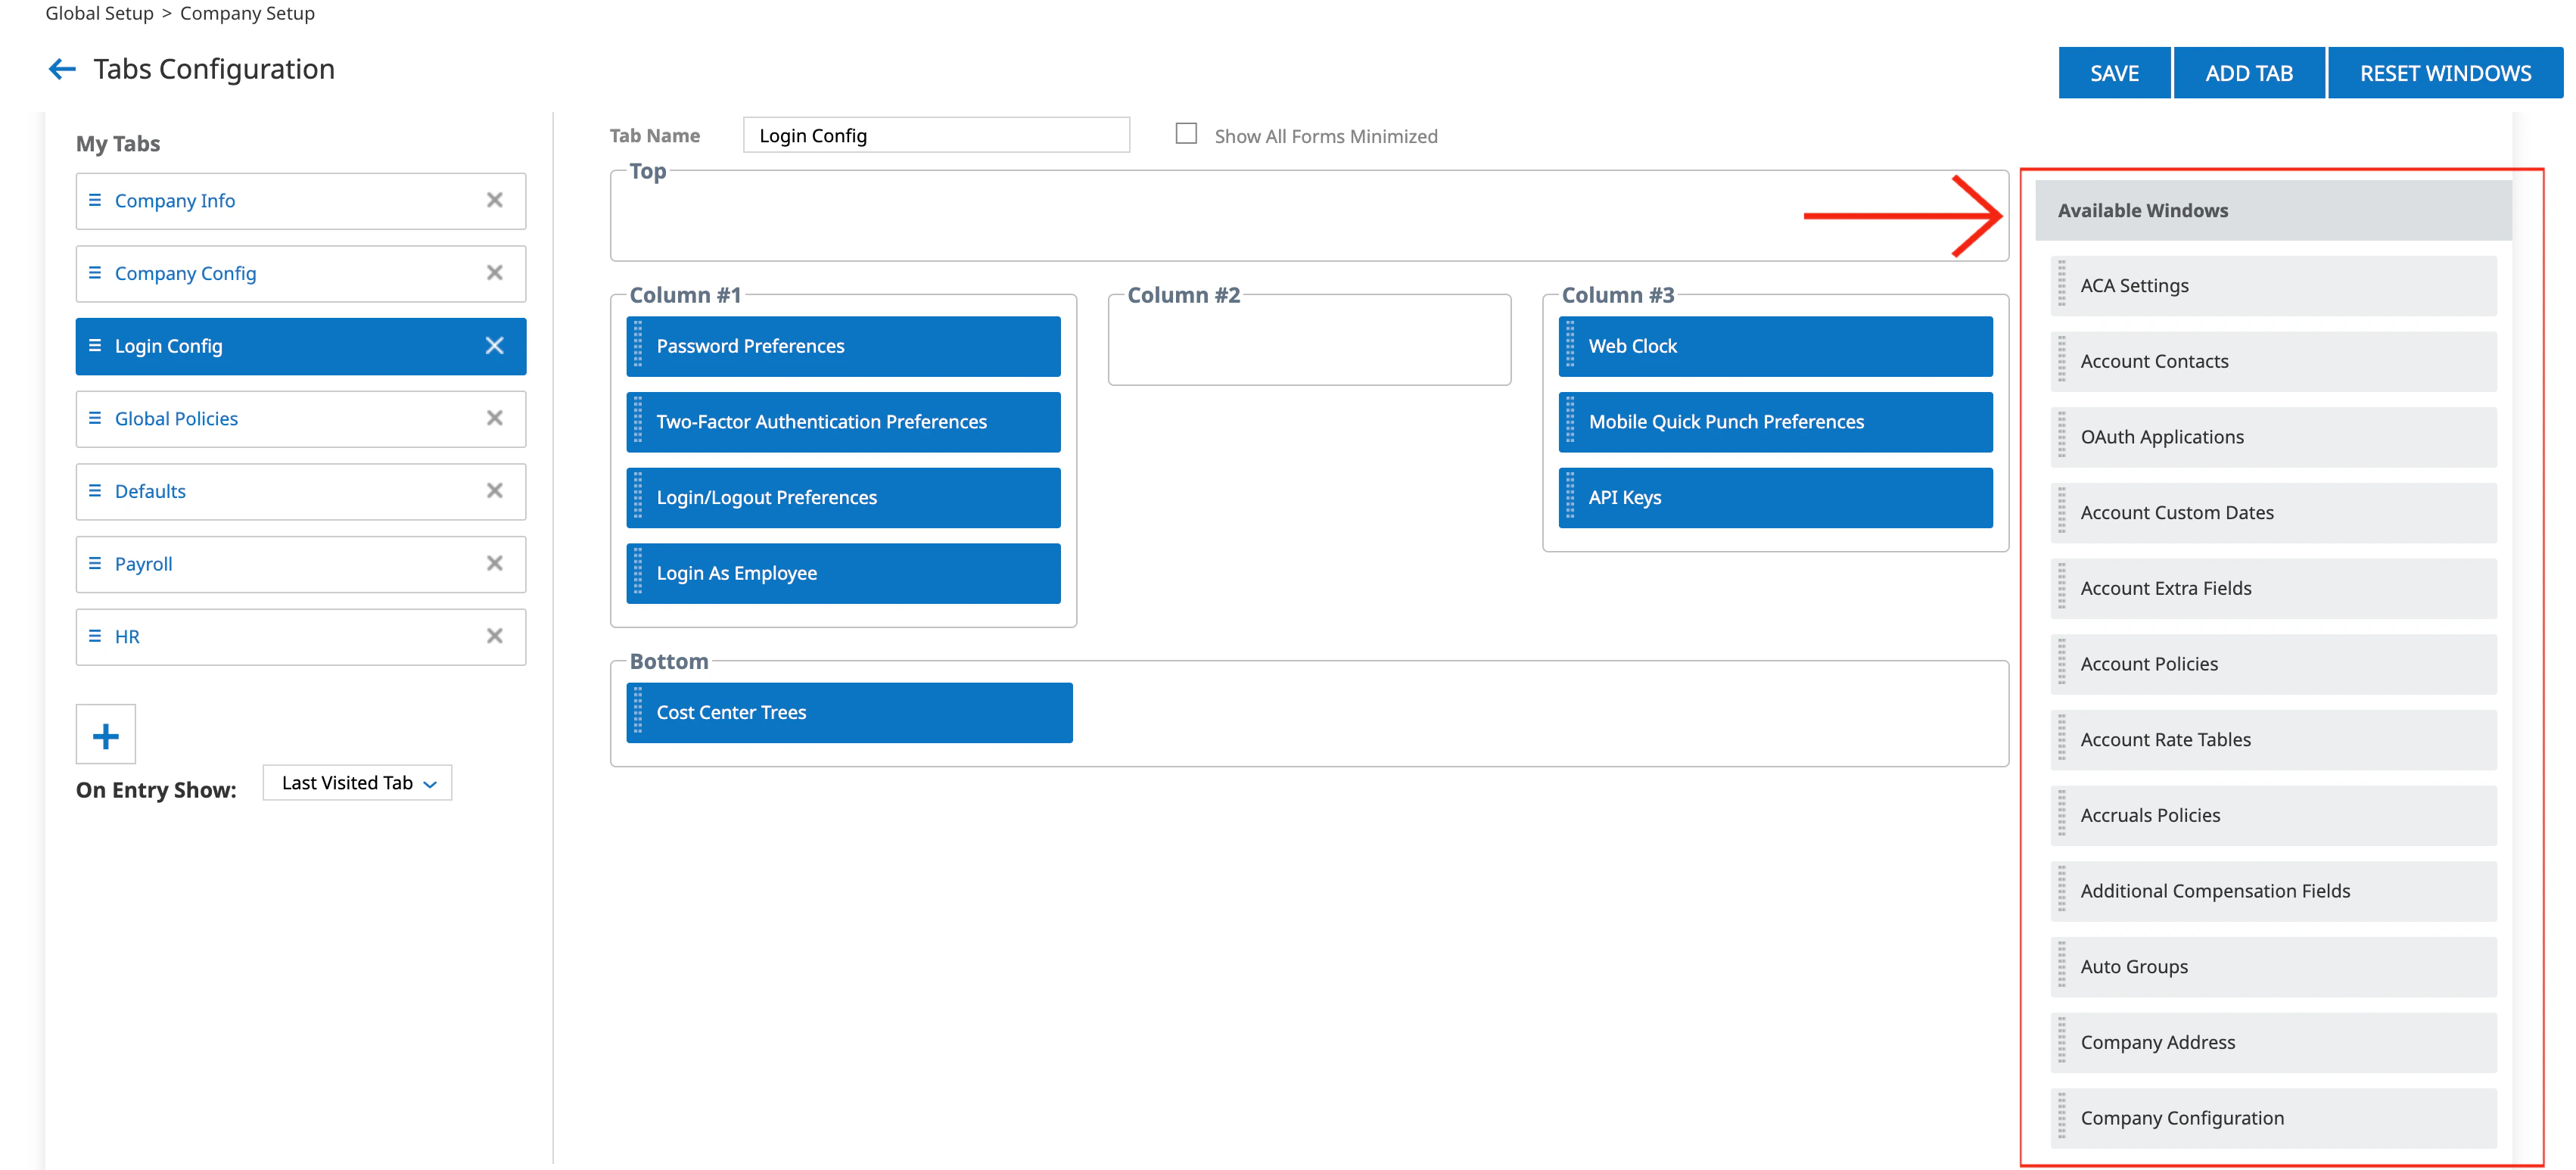 Drag it into a column of your choice under the `Login Config` tab.
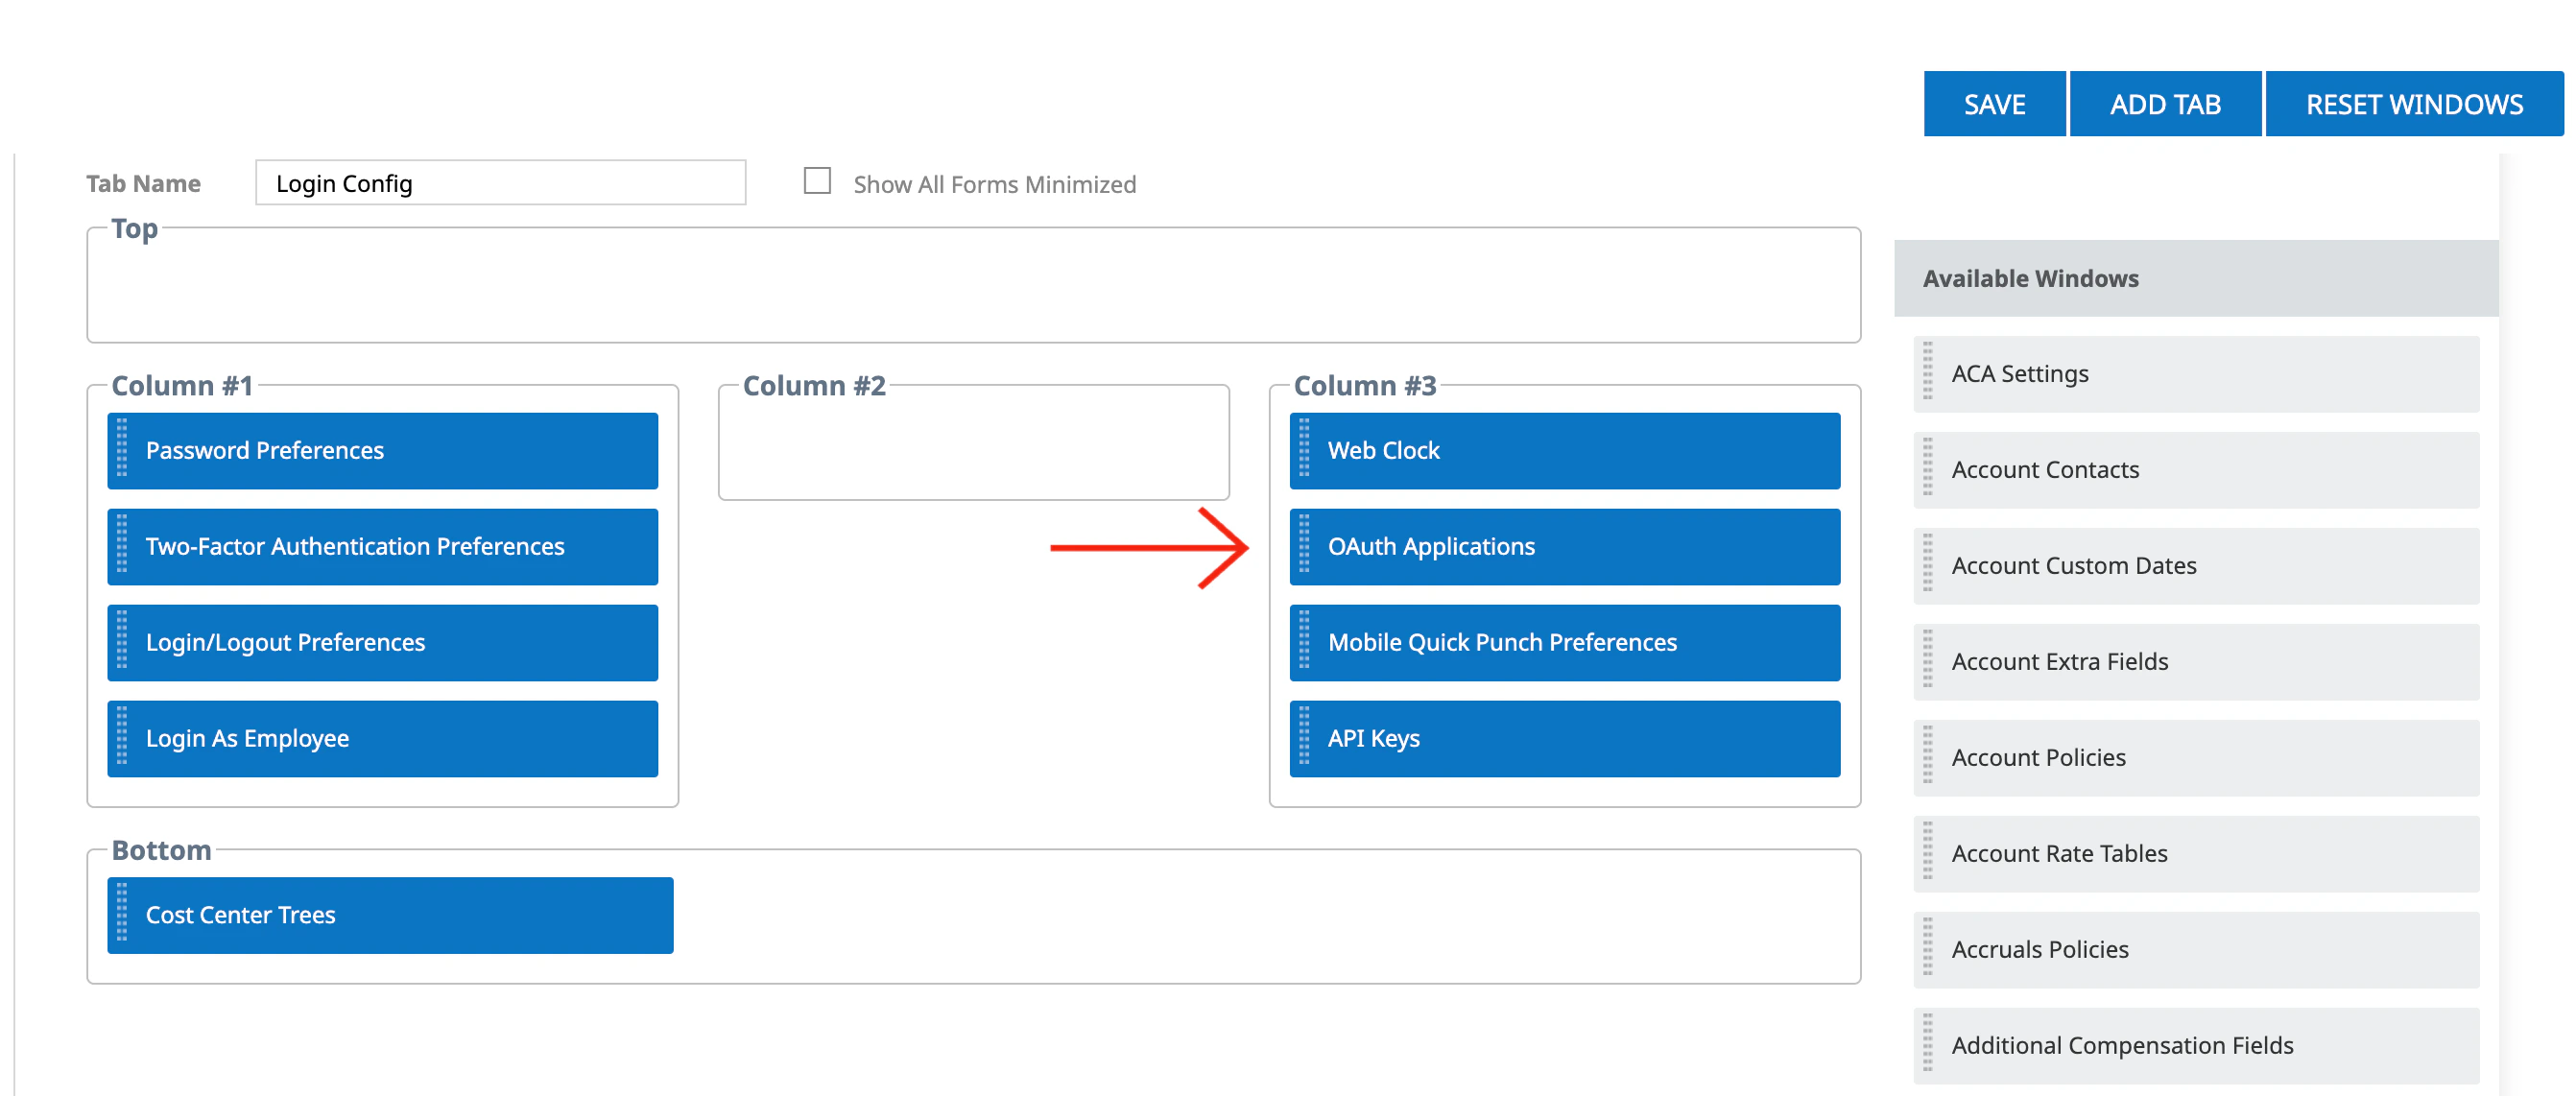 Once you're happy with the view - click `Save` and navigate back to the `Company Setup` view.
 ## Generating OAuth Credentials
Under *Company Setup* on the `Login Config` tab,
## Generating OAuth Credentials
Under *Company Setup* on the `Login Config` tab,
 Find `OAuth Applications` and click `Add OAuth Application`
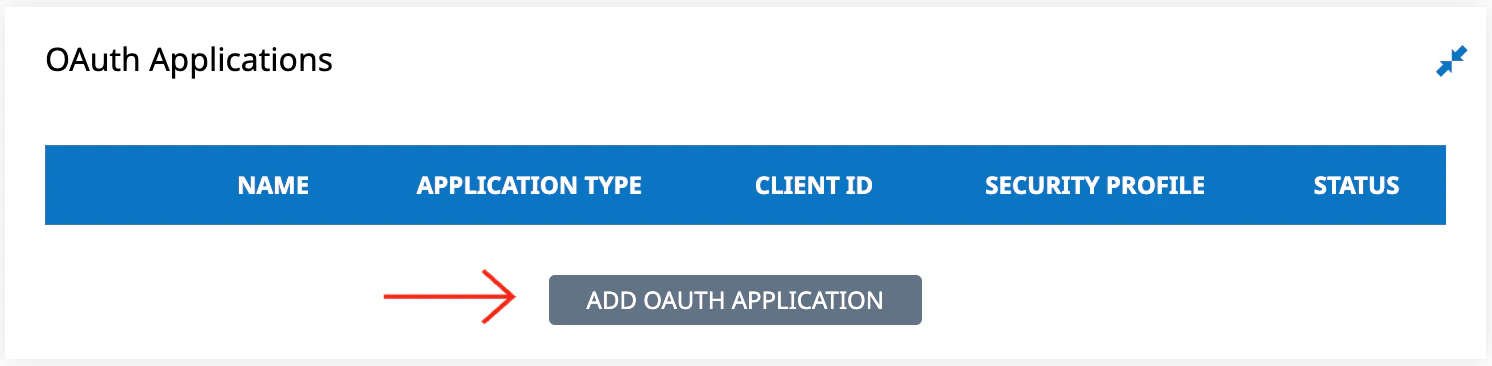 Enter the following field values:
* **Name:** Enter a name for this new OAuth application
* **Application Type:** Select `Interactive`
* **Client Id:** Generated automatically
* **Redirect URL:** `https://api.stackone.com/connect/oauth2/ukgready/callback`
Enter the following field values:
* **Name:** Enter a name for this new OAuth application
* **Application Type:** Select `Interactive`
* **Client Id:** Generated automatically
* **Redirect URL:** `https://api.stackone.com/connect/oauth2/ukgready/callback`
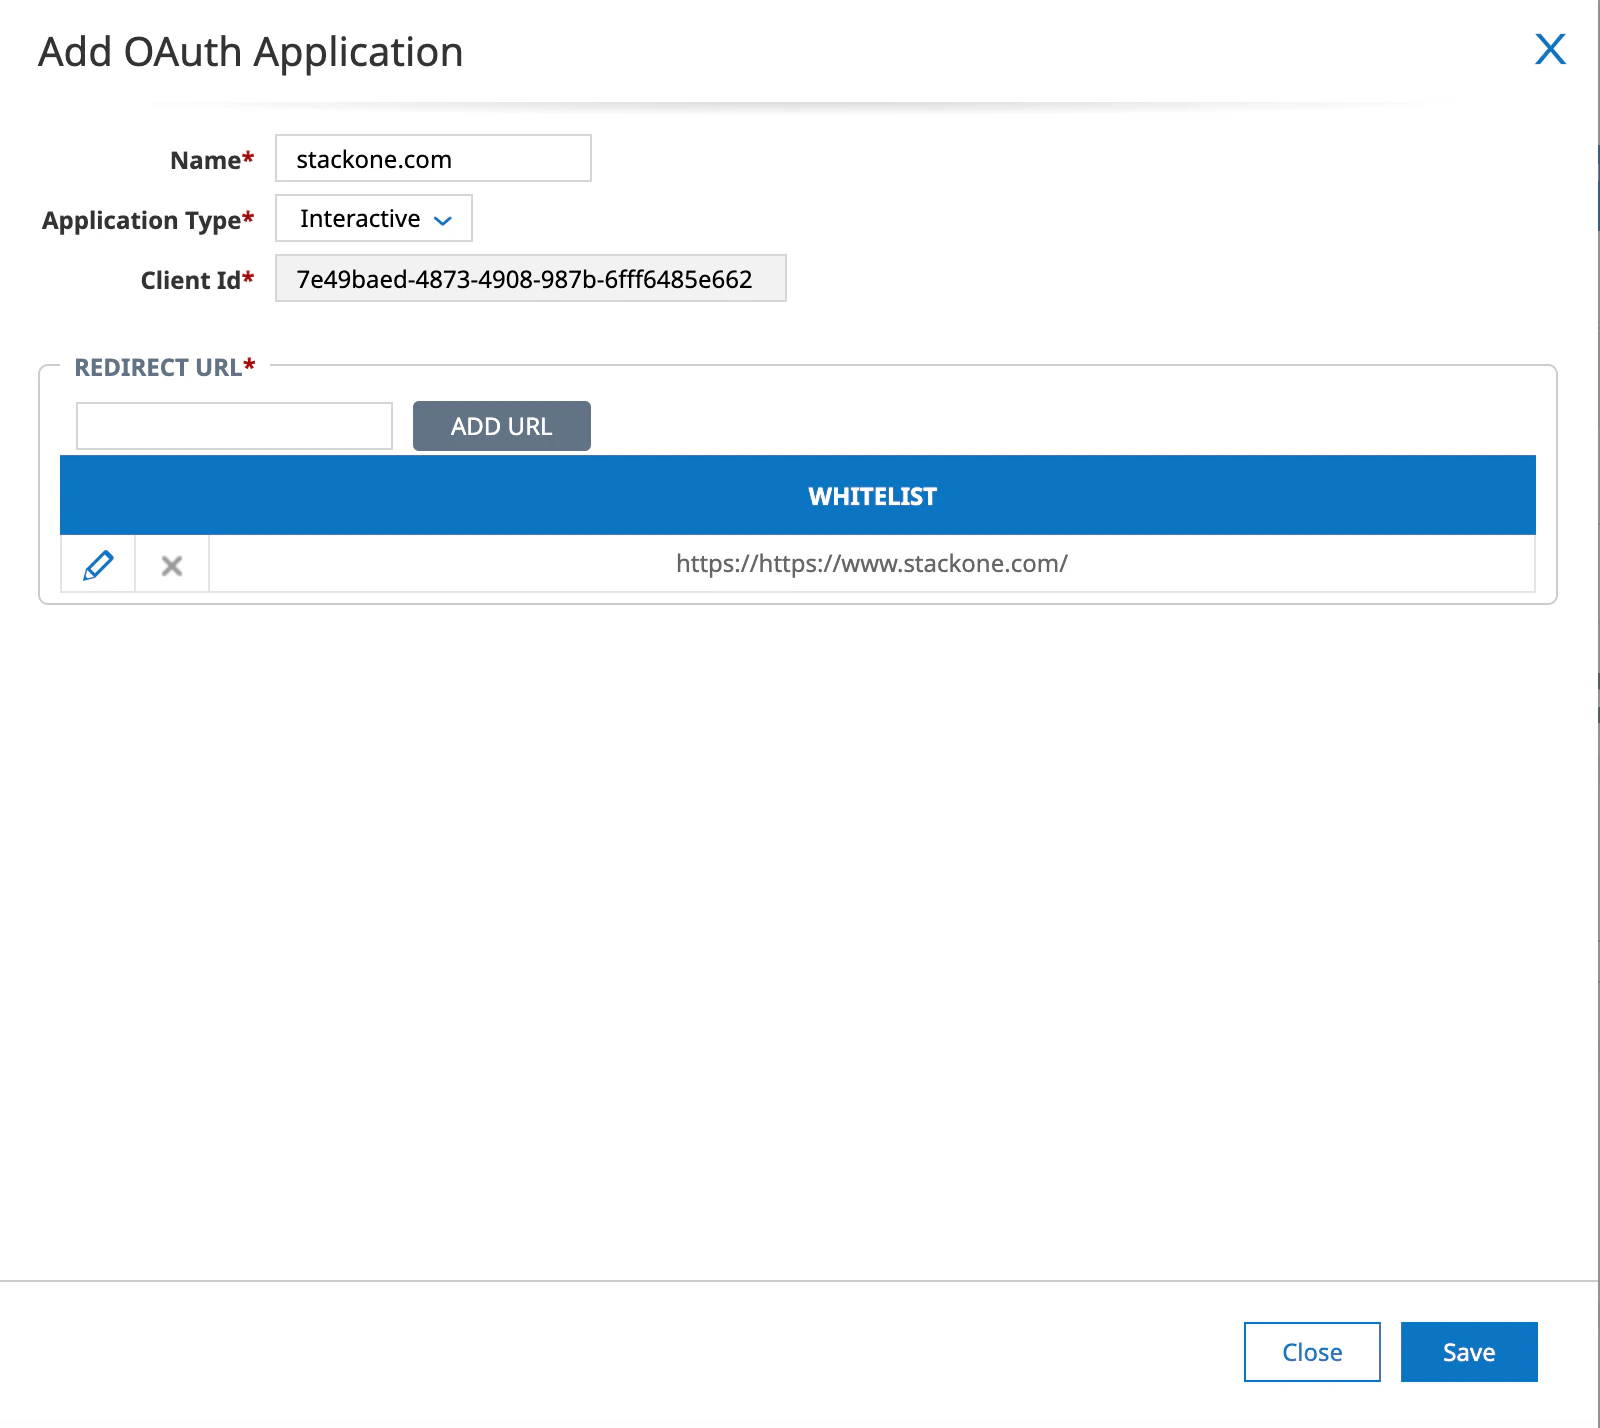 Once you're happy with the configuration - click the `Save` button.
## Job Change Reason Codes
UKG Ready (OAuth) requires a Job Change Reason Code when assigning a job to a new hire or changing an employee's job. At least one of these fields is required if employee jobs will be assigned via this connection.
Click `≡` at the top-left corner.
Navigate to `Settings > HR Setup > Company Setup > Job Change Reason Codes`
Once you're happy with the configuration - click the `Save` button.
## Job Change Reason Codes
UKG Ready (OAuth) requires a Job Change Reason Code when assigning a job to a new hire or changing an employee's job. At least one of these fields is required if employee jobs will be assigned via this connection.
Click `≡` at the top-left corner.
Navigate to `Settings > HR Setup > Company Setup > Job Change Reason Codes`
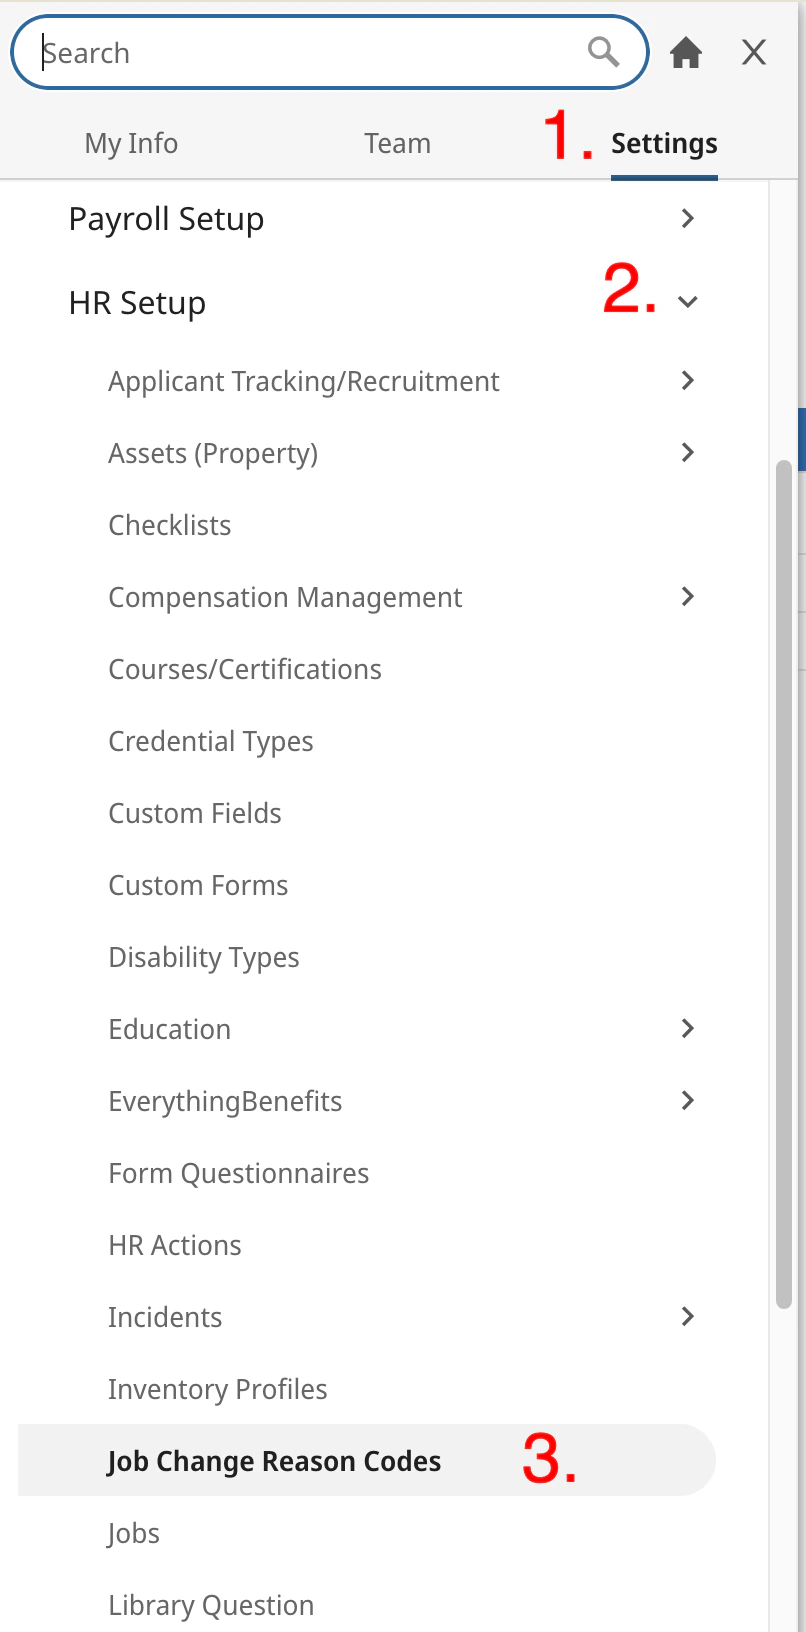 The existing codes for your company will be displayed here. For the following fields on the connector hub form,
* **Job Change Reason Code - New Hire** field, we recommend using a code of Type `New Hire`.
* **Job Change Reason Code - Other** field, we recommend using a code of Type `Other`.
You can create a new code by clicking the `ADD NEW` button in the top-right.
The existing codes for your company will be displayed here. For the following fields on the connector hub form,
* **Job Change Reason Code - New Hire** field, we recommend using a code of Type `New Hire`.
* **Job Change Reason Code - Other** field, we recommend using a code of Type `Other`.
You can create a new code by clicking the `ADD NEW` button in the top-right.
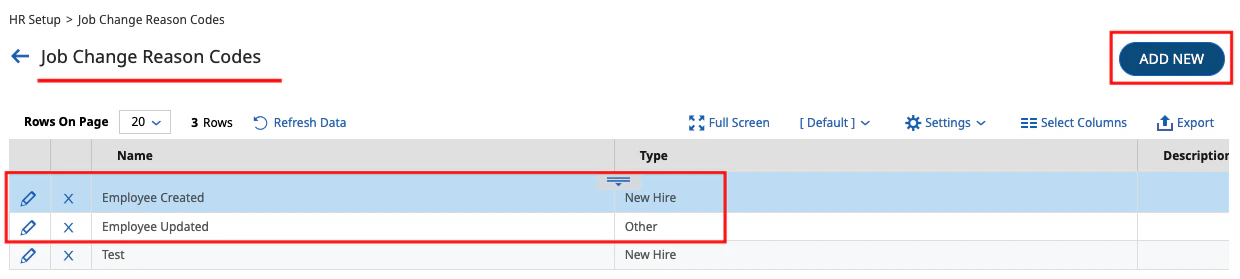 Copy the **Name** of each code you wish to use.
## Connecting with StackOne
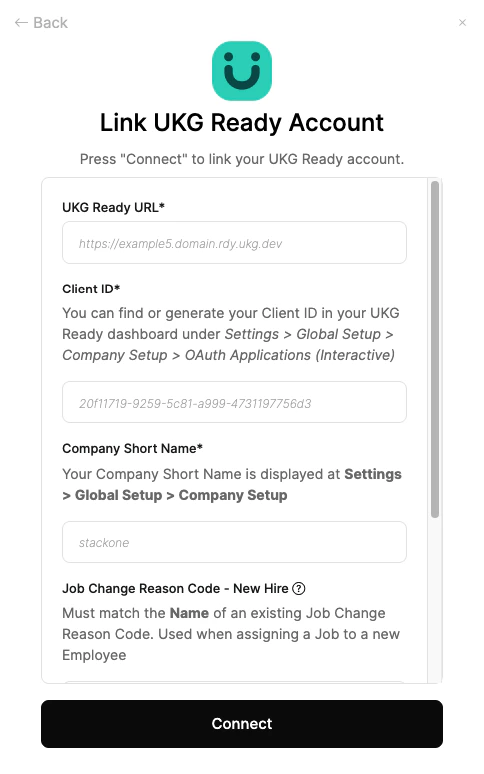
Upon reaching the Link Account page, enter the following credentials:
* UKG Ready URL
* Client ID
* Company Short Name
* Job Change Reason Code - New Hire (optional)
* Job Change Reason Code - Other (optional)
Proceed by clicking the `Connect` button.
Copy the **Name** of each code you wish to use.
## Connecting with StackOne
Upon reaching the Link Account page, enter the following credentials:
* UKG Ready URL
* Client ID
* Company Short Name
* Job Change Reason Code - New Hire (optional)
* Job Change Reason Code - Other (optional)
Proceed by clicking the `Connect` button.
Congratulations, you're all set! If you face any issues with the steps mentioned above,
please contact us by emailing [integrations@stackone.com](mailto:integrations@stackone.com). We're always here to assist you!
## Useful Links
[https://library.ukg.com/ukg-ready](https://library.ukg.com/ukg-ready)